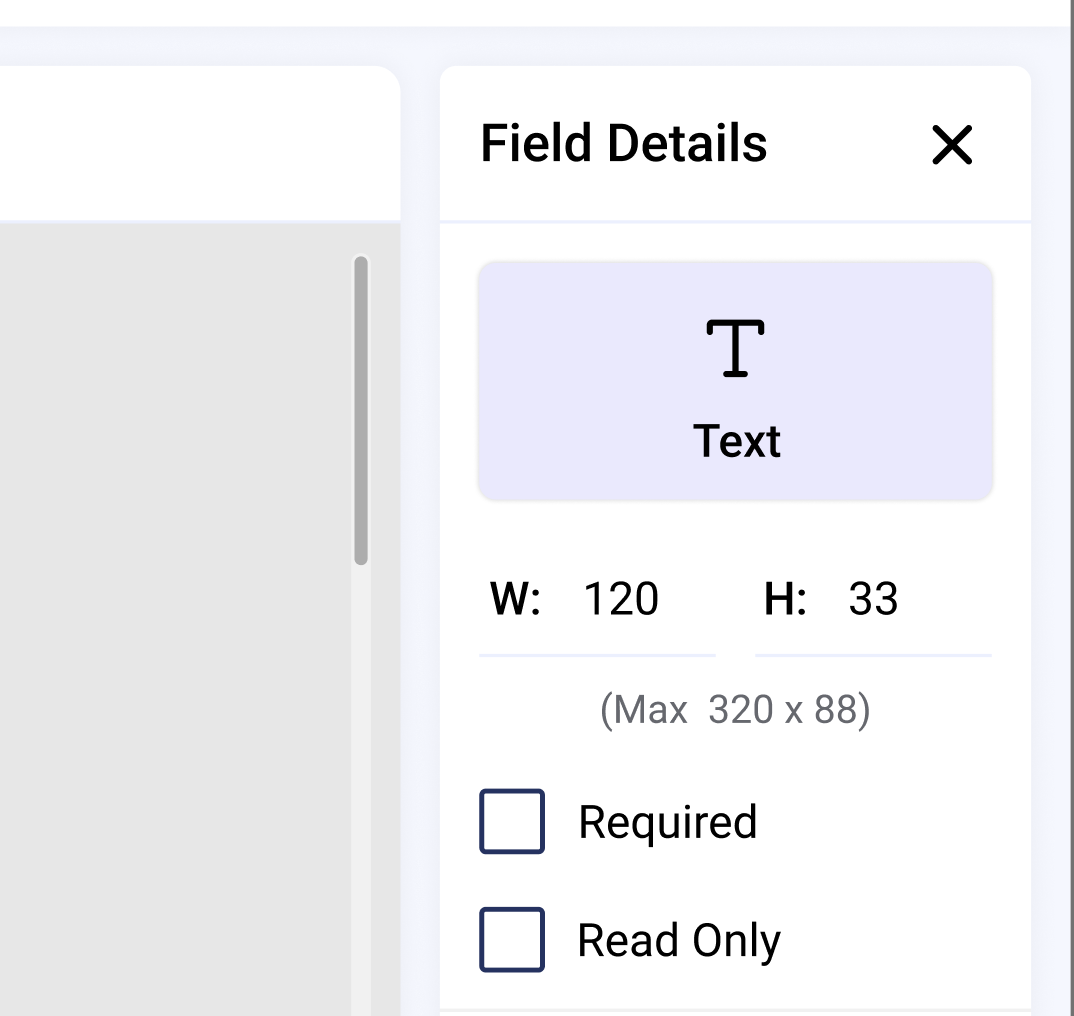
How do I control the size of a tag?
When a tag is placed on a document, you may choose to click and drag the corner of the tag to enlarge or reduce the size.

Additional controls appear in the Tag Resize Panel, allowing you to control the font, font size and other attributes such as bold or italic.

Tag size attributes are now saved as part of Document Templates. You may additionally modify the tag size attributes while editing Document Templates on the Templates page.
How do I control the size of a tag?
When a tag is placed on a document, you may choose to click and drag the corner of the tag to enlarge or reduce the size.

Additional controls appear in the Tag Resize Panel, allowing you to control the font, font size and other attributes such as bold or italic and text alignment.
Tag size attributes are now saved as part of Document Templates. You may additionally modify the tag size attributes while editing Document Templates on the Templates page.

Contact Us
Great, Thank you!
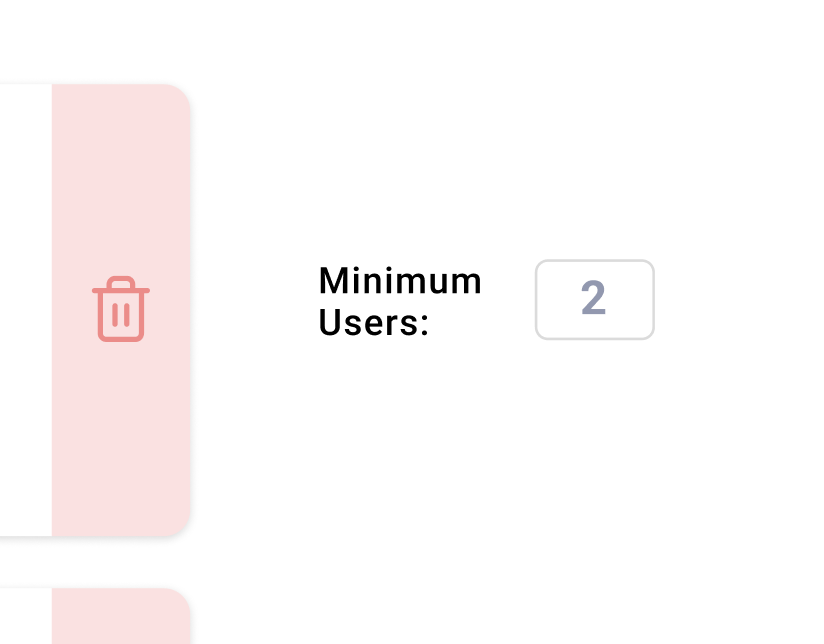
How do I use ‘Minimum Users’ feature in my Workflow?
When you are creating a Workflow and you add a sign or review state to the workflow, you will see that there is a checkbox for minimum user. You may check the checkbox and then enter the minimum number of users into the number box that appears. By default, the number 1 will be in the minimum user box. Once the minimum number of users have approved the ePak documents, the ePak will progress to the next State in the Workflow.
For example, you may create a Workflow with 5 users in a Review or Sign State. You may then choose to set minimum users to 2. When you send the ePak, all 5 users will receive an email notification. However, once the first 2 users respond and approve the ePak, the ePak will then move to the next Workflow State. The remaining 3 users will receive a notice that they no longer need to perform any action on the ePak.
This is extremely helpful if you have a team of Reviewers available, but you only need approval of few. It helps your ePak progress through the workflow faster.

How do I use ‘Minimum Users’ feature in my Workflow?
When you are creating a Workflow and you add a sign or review state to the workflow, you will see that there is a field for minimum user. You may enter the minimum number of users in the box. By default, the number 0 will be selected in the minimum user box. Once the minimum number of users have approved the ePak documents, the ePak will progress to the next State in the Workflow.
This is extremely helpful if you have a team of Reviewers available, but you only need the approval of a few. It helps your ePak progress through the workflow faster.
Contact Us
Great, Thank you!
How do I view all my Workflows?
To view Workflows,
- Go to the Templates page by clicking on Templates tab on the top navigation panel.
- By default, all Workflows will appear on the left side of the screen unless you choose Documents tab to view document templates.
- Select a Workflow to view the workflow details in the center panel and the workflow diagram on the right.

How do I edit an existing Workflow?
To edit a Workflow,
- Go to the Templates page by clicking on Templates link on the top navigation panel.
- All the existing workflows will appear on left side of the screen.
- Select a Workflow to view the workflow details.
- You may then change value of any of the fields: Accessibility, signing policy, states or signers or other optional settings like minimum reviewers, smart tags, allow signer attachment, special instructions etc.
- You may add more states or delete the existing ones by using Insert Above/Insert Below/delete option from the icon next in the State field. You may also change the sequence of the states by using Move Up or Move down option.
- For each state, you may add/delete signers and choose a certificate policy (if allowed).
- To add a signer, simply start typing the name in add user field and select from the options available. If you have previously sent an ePak to the recipient, they will appear in your Favorite Users list when you start typing their name. If the user does not appear, you may click the Search link to search all users.
- To delete signer, click on the ‘x’ sign available next to the signer’s name.
- Click the Save button in the upper right corner.
- All the applied changes will be saved and a confirmation message ‘Workflow modified successfully’ appears.
- Click Ok
- Changes to a Workflow are only applied to future ePaks that the Workflow is attached to. Changes do not affect ePaks that already have the Workflow attached.
- Click the ‘x’ icon available next to the workflow name to remove the workflow.
- When a workflow is removed, it will no longer be available to use. All the ePaks that have this workflow
- already attached will not be affected by removing the workflow.
How do I View/Edit/Delete my Workflows?
To View/Edit Workflows,
1) Go to the Templates page by clicking on Templates tab on the top navigation panel. By default, all Workflows will appear on the screen.
2) To view the workflow details, click on the edit button in front of the workflow.

3) You may then change value of any of the fields: Workflow Name, Subject, Accessibility, Signing Policy, Workflow states (Add/remove/change sequence) or signers or other optional settings like minimum reviewers, smart tags, allow signer attachment, special instructions etc. Click the Save button in the upper right corner and a confirmation message will be displayed.
To Delete a workflow,
Click the Delete button available next to the workflow name. Users will receive a pop up to confirm the deletion.
Contact Us
Great, Thank you!
What are Document templates and why would these be needed?
Document templates are templates that save the position of different tags to use on a document. You may or may not associate a document with the document template.
Just like workflow templates, document templates also improve efficiency and save time. These are apt for situations where documents of same format are sent repeatedly with signature required at the same position. Such documents may also have several pages which a custodian has to scroll through every time before placing a signature tag. Thus, using a document template saves you from dragging and dropping the signature tags after scrolling through all the pages. The custodian needs to do it only once and then save it as a template to be used every other time for documents of the same format.
Contact Us
Great, Thank you!
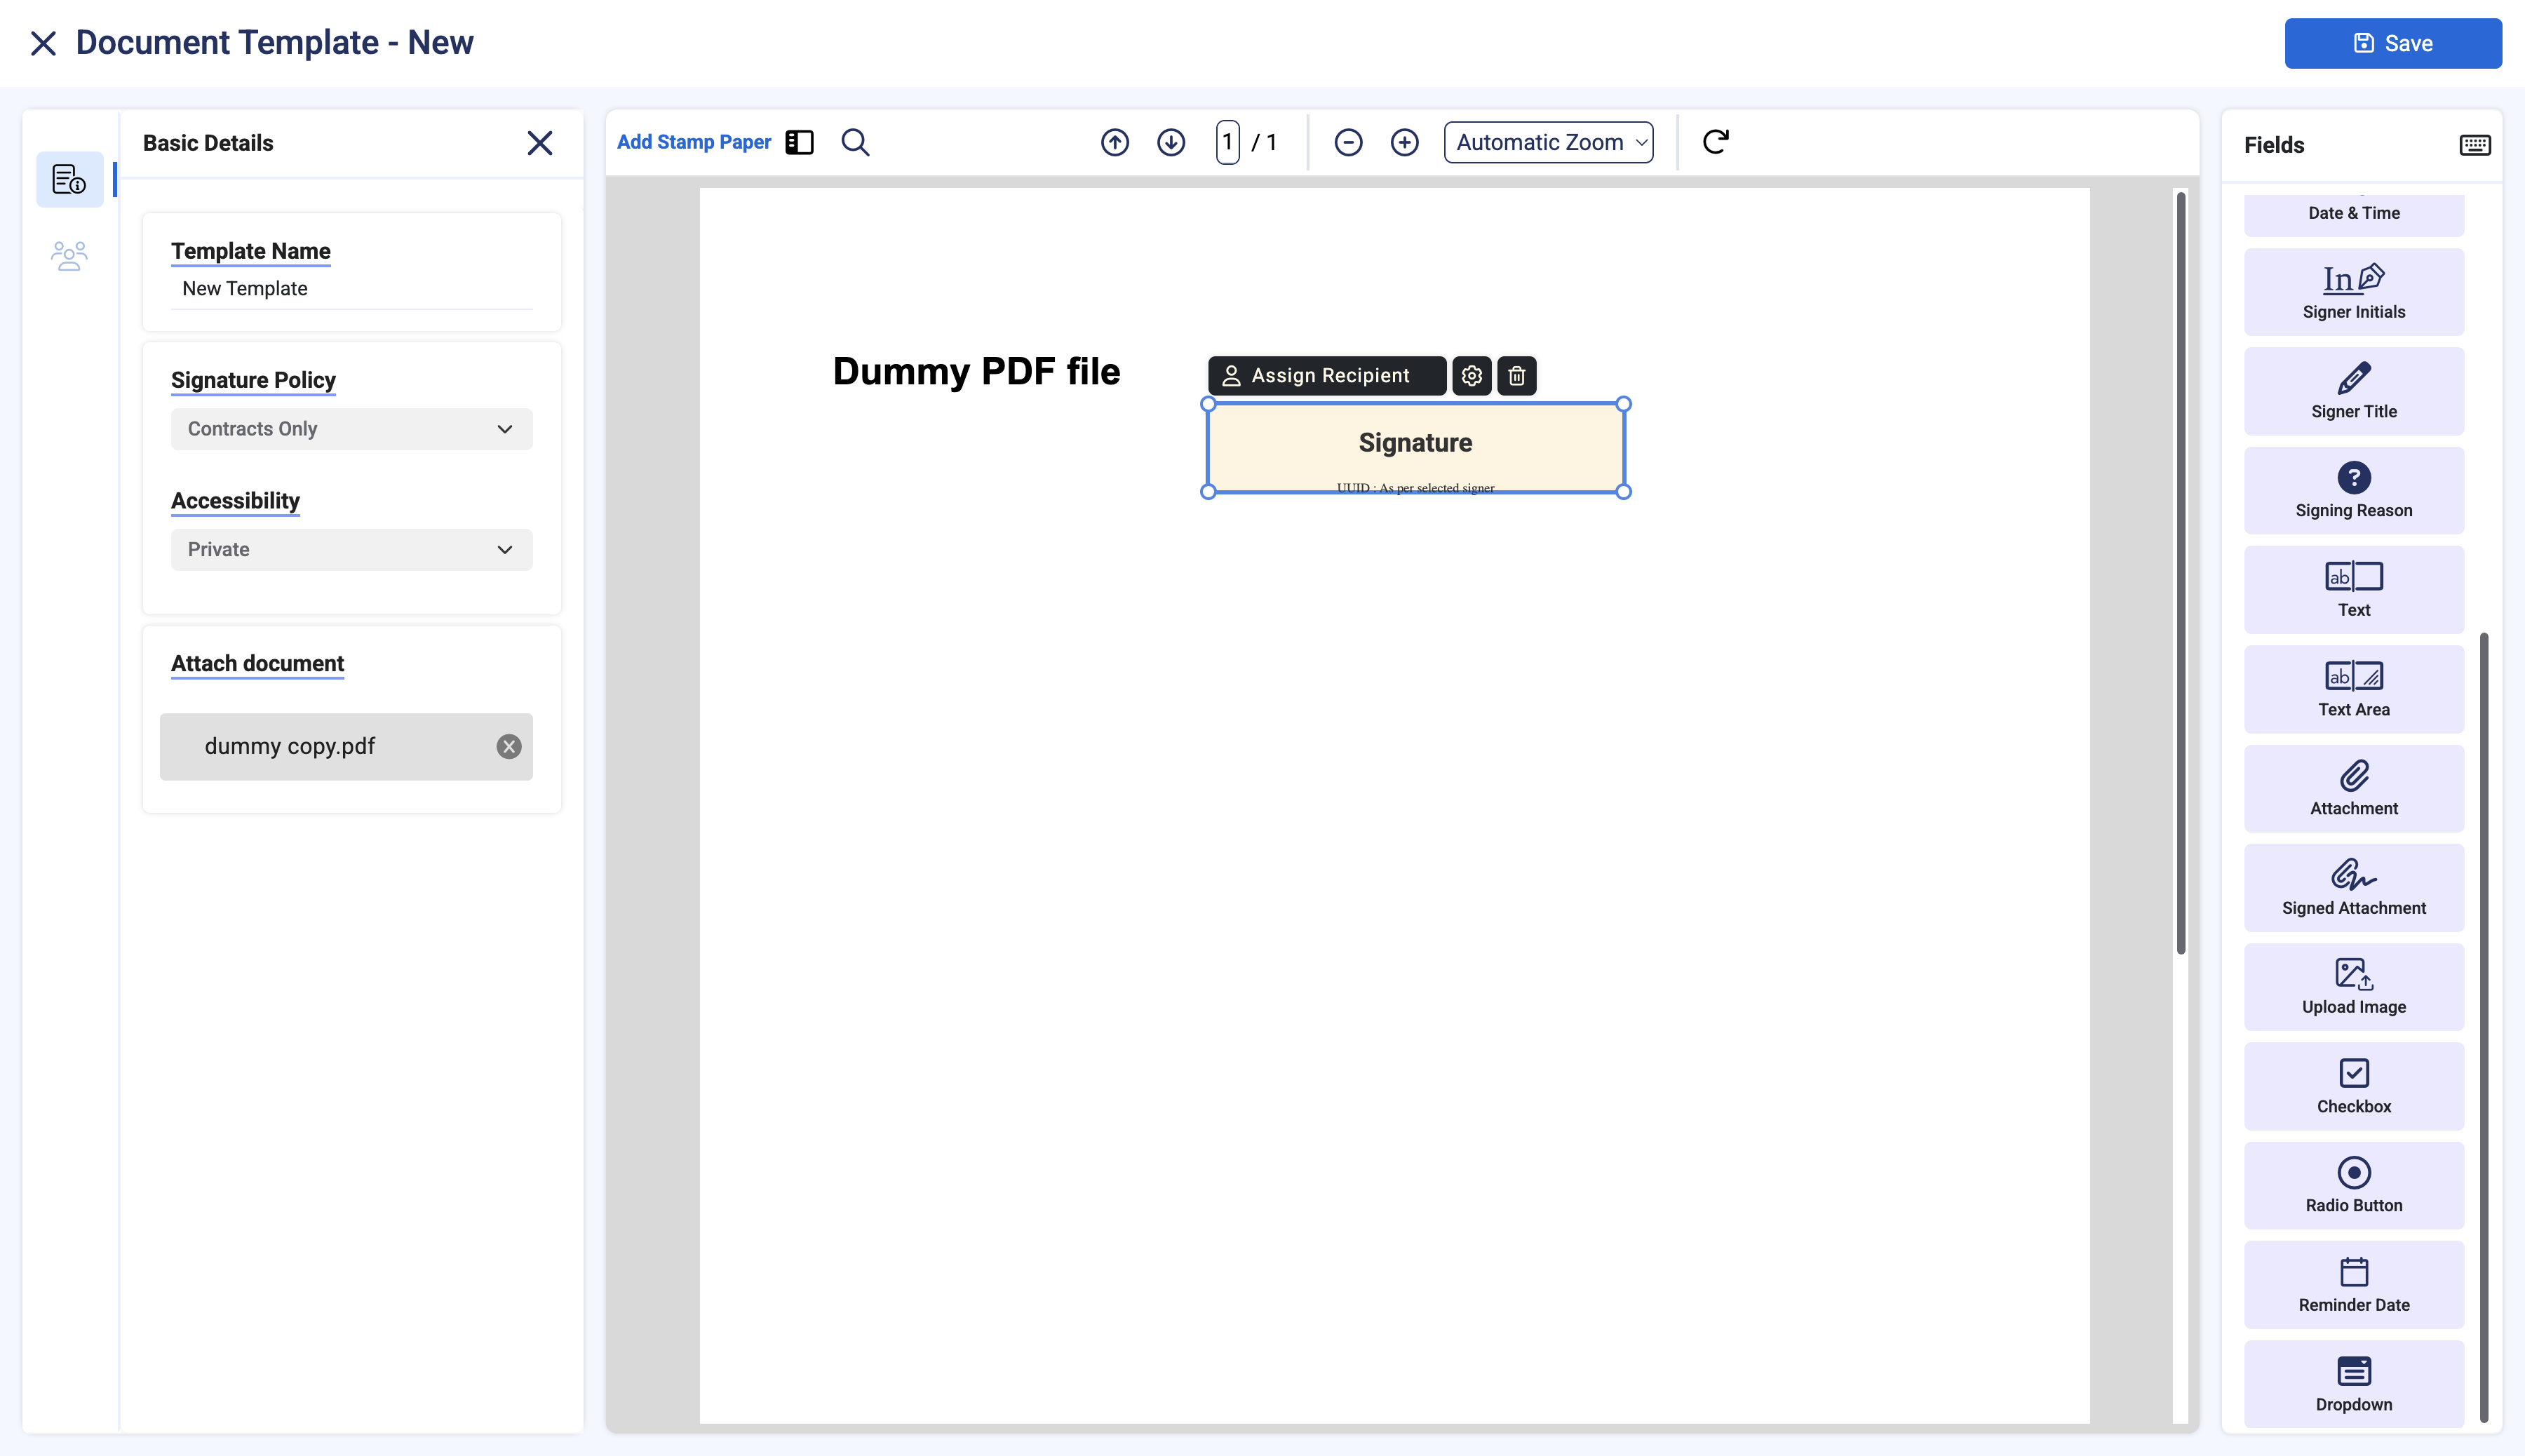
How do I create a Document template?
Document templates are templates that save the position of different tags to use on a document. You may or may not associate a document with the document template. A document template can be created from the Templates page.
- On the Templates Page- Click the Documents tab.
- Attach a document (optional). If you are using a PDF that contains pre-existing form fields, you can map it to signers. Each fillable form field can either be assigned to a signer or left unassigned to be filled by any signer and no one in specific.
- Select a signature policy.
- Choose the accessibility of your document template. You can either make it Public, Private or Group.
- Private – only you may use the workflow.
- Public – other Custodians may use the workflow however they will not be able to edit the template, only you may edit it.
- Group – Workflow will be available to the Custodian members of your groups
- Drop the signature tag(s) for the first Signer placeholder (you may add additional signer placeholders as needed).
- Click Save on the top right corner.
- Name your template to be saved and used in future.
- It shows a success message and this template will now be visible under ‘Templates’.

How do I create a Document template?
Document templates are templates that save the position of different tags to use on a document. You may or may not associate a document with the document template. A document template can be created from the Templates page.
1) On the Templates Page, select the Documents tab and click on the Create button.
2) Add a Template Name, select a signature policy, Choose the accessibility of your document template. You can either make it Public, Private or Group. Attach a document (optional). If you are using a PDF that contains pre-existing form fields, you can map it to signers. Each fillable form field can either be assigned to a signer or left unassigned to be filled by any signer and no one in specific.
3) Drop the signature tag(s) for the first Signer placeholder (you may add additional signer placeholders as needed).
4) Click Save on the top right corner. MSB Displays a success message, and this template will now be visible under ‘Templates’.
Contact Us
Great, Thank you!
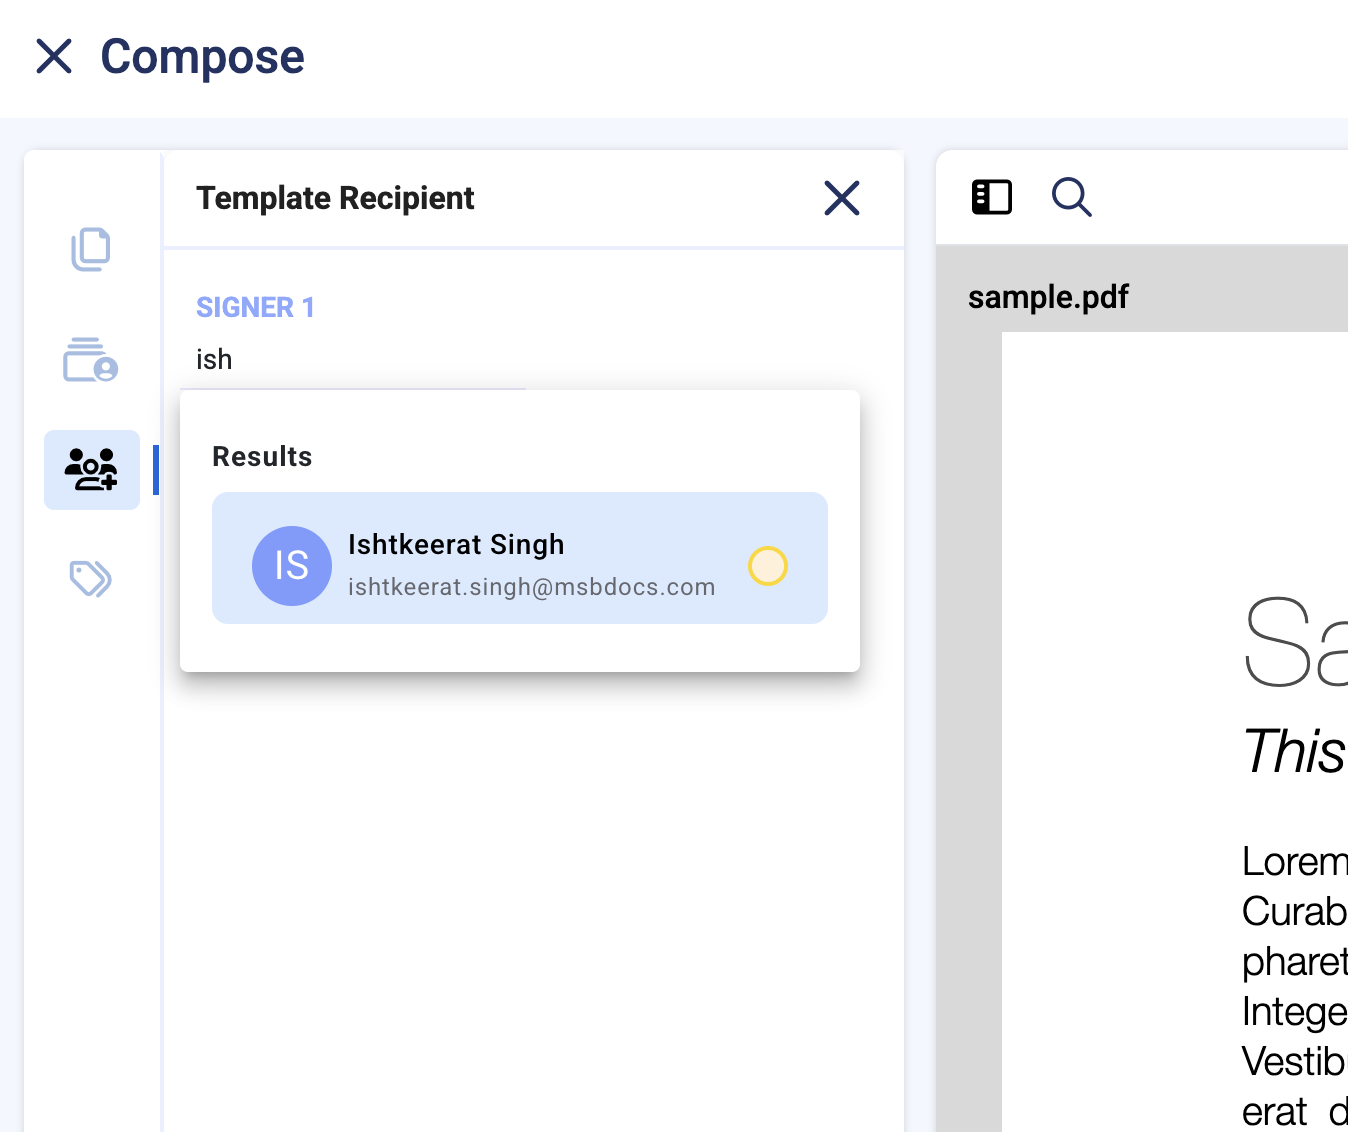
How do I use an existing Document Template?
To use an existing document template while composing a single ePak:
- Click the Compose tab available in the main navigation bar at the top of the page and choose single or you may choose the Compose button just above the ePak folders.
- Click the Attach button.

- Choose the Document Templates tab. By default, all templates (created by you and others shared publicly) will be listed however you can choose the option from the dropdown list to sort them differently.

- Select a document template from the list and it will be highlighted in blue.
- Click Next. If there is a document attached to the document template, you may choose to proceed with that or change/upload a document at this step.

- Click done to load the document template on the compose page. You will be prompted to confirm if you wish to accept all the other settings of the document template as is. Select yes.

- Use an existing workflow or create one on the fly.

- In the Document Template Settings window, for each Signer in the document template, enter the name of a signer that is in your workflow.

- Signature tag(s) will get applied automatically to the position specified at the time of template creation.
- Your ePak is ready to be sent now. Please note, your ePak may contain more than one document, and you may apply the same document template to each document, or you may use separate document templates on each document, or no document template at all on some of the documents. If you use the same document template on another document in the ePak, you will need to again enter the name of a signer that is in your workflow in the document template settings window (each document has to be configured individually).
How do I use an existing Document Template?
To use an existing document template while composing a single ePak:
1) Click the Compose button and you will see an option to upload a document using the document Templates.

2) Click on Document Templates and all templates (created by you or shared publicly) will be listed. Select the template you would like to use by clicking on ‘Use Template’.
3) The document will get loaded. Click next to add the signers. In the Document Template Recipients window, for each Signer in the document template, enter the name of a signer that is in your workflow. Signature tag(s) will get applied automatically to the position specified at the time of template creation


4) Your ePak is ready to be sent now.
Contact Us
Great, Thank you!
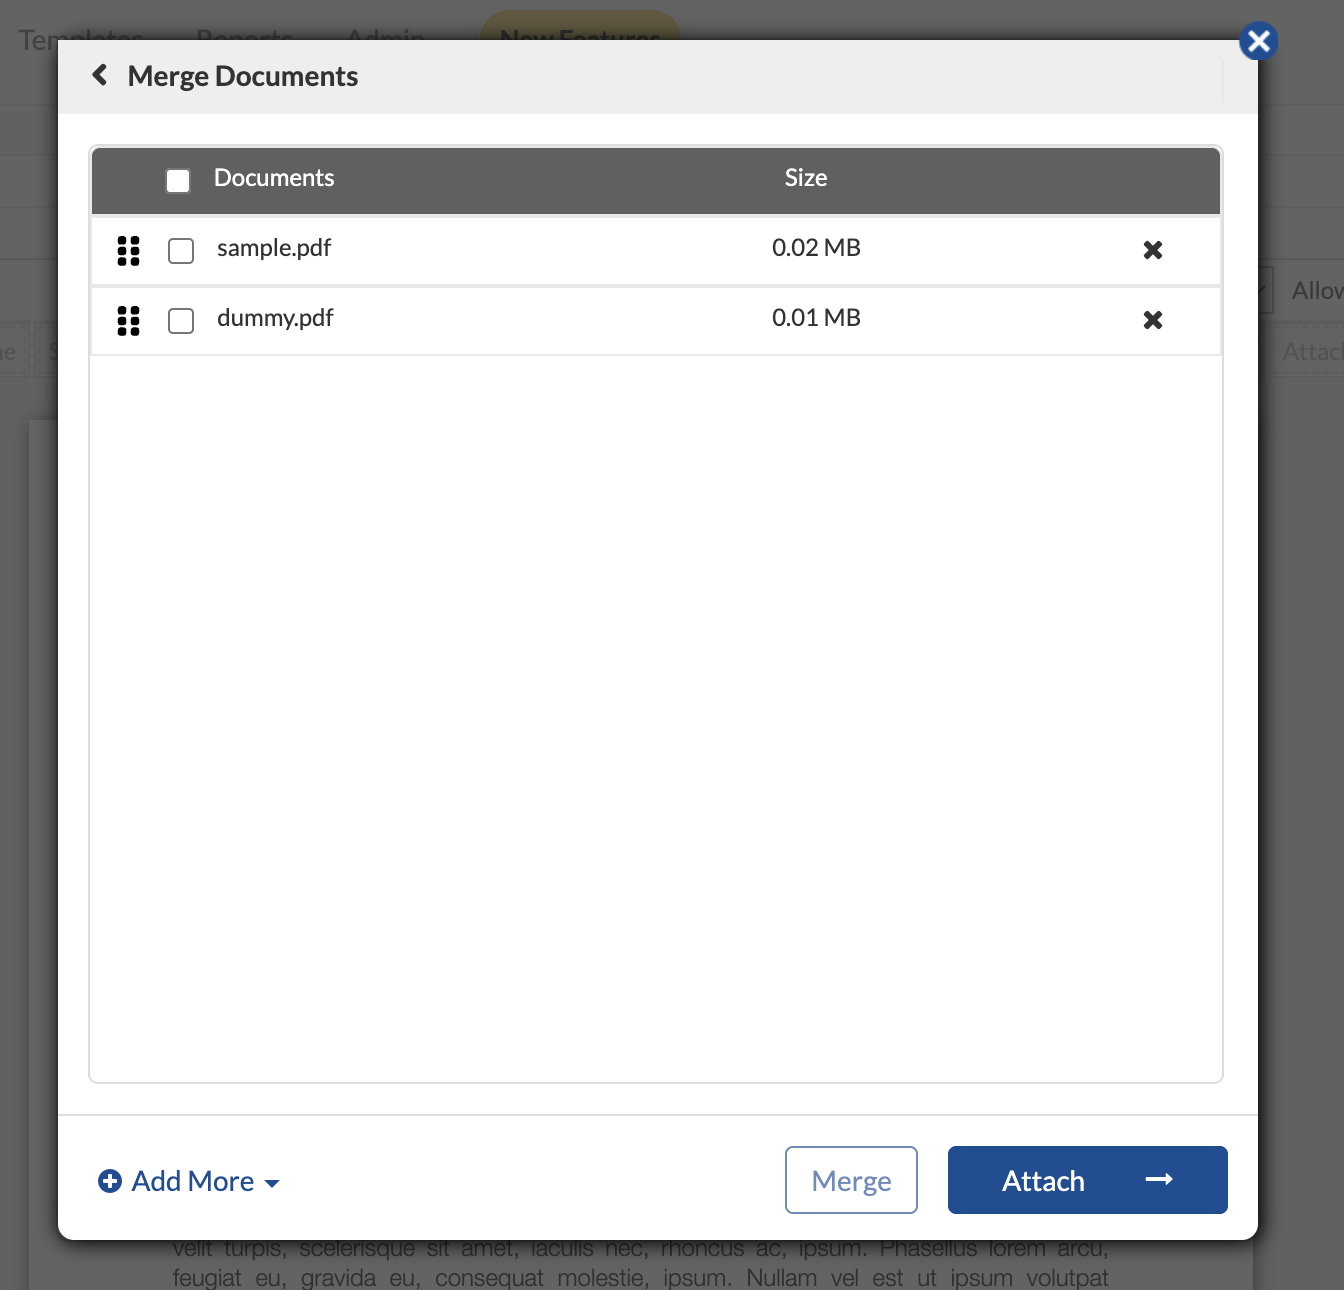
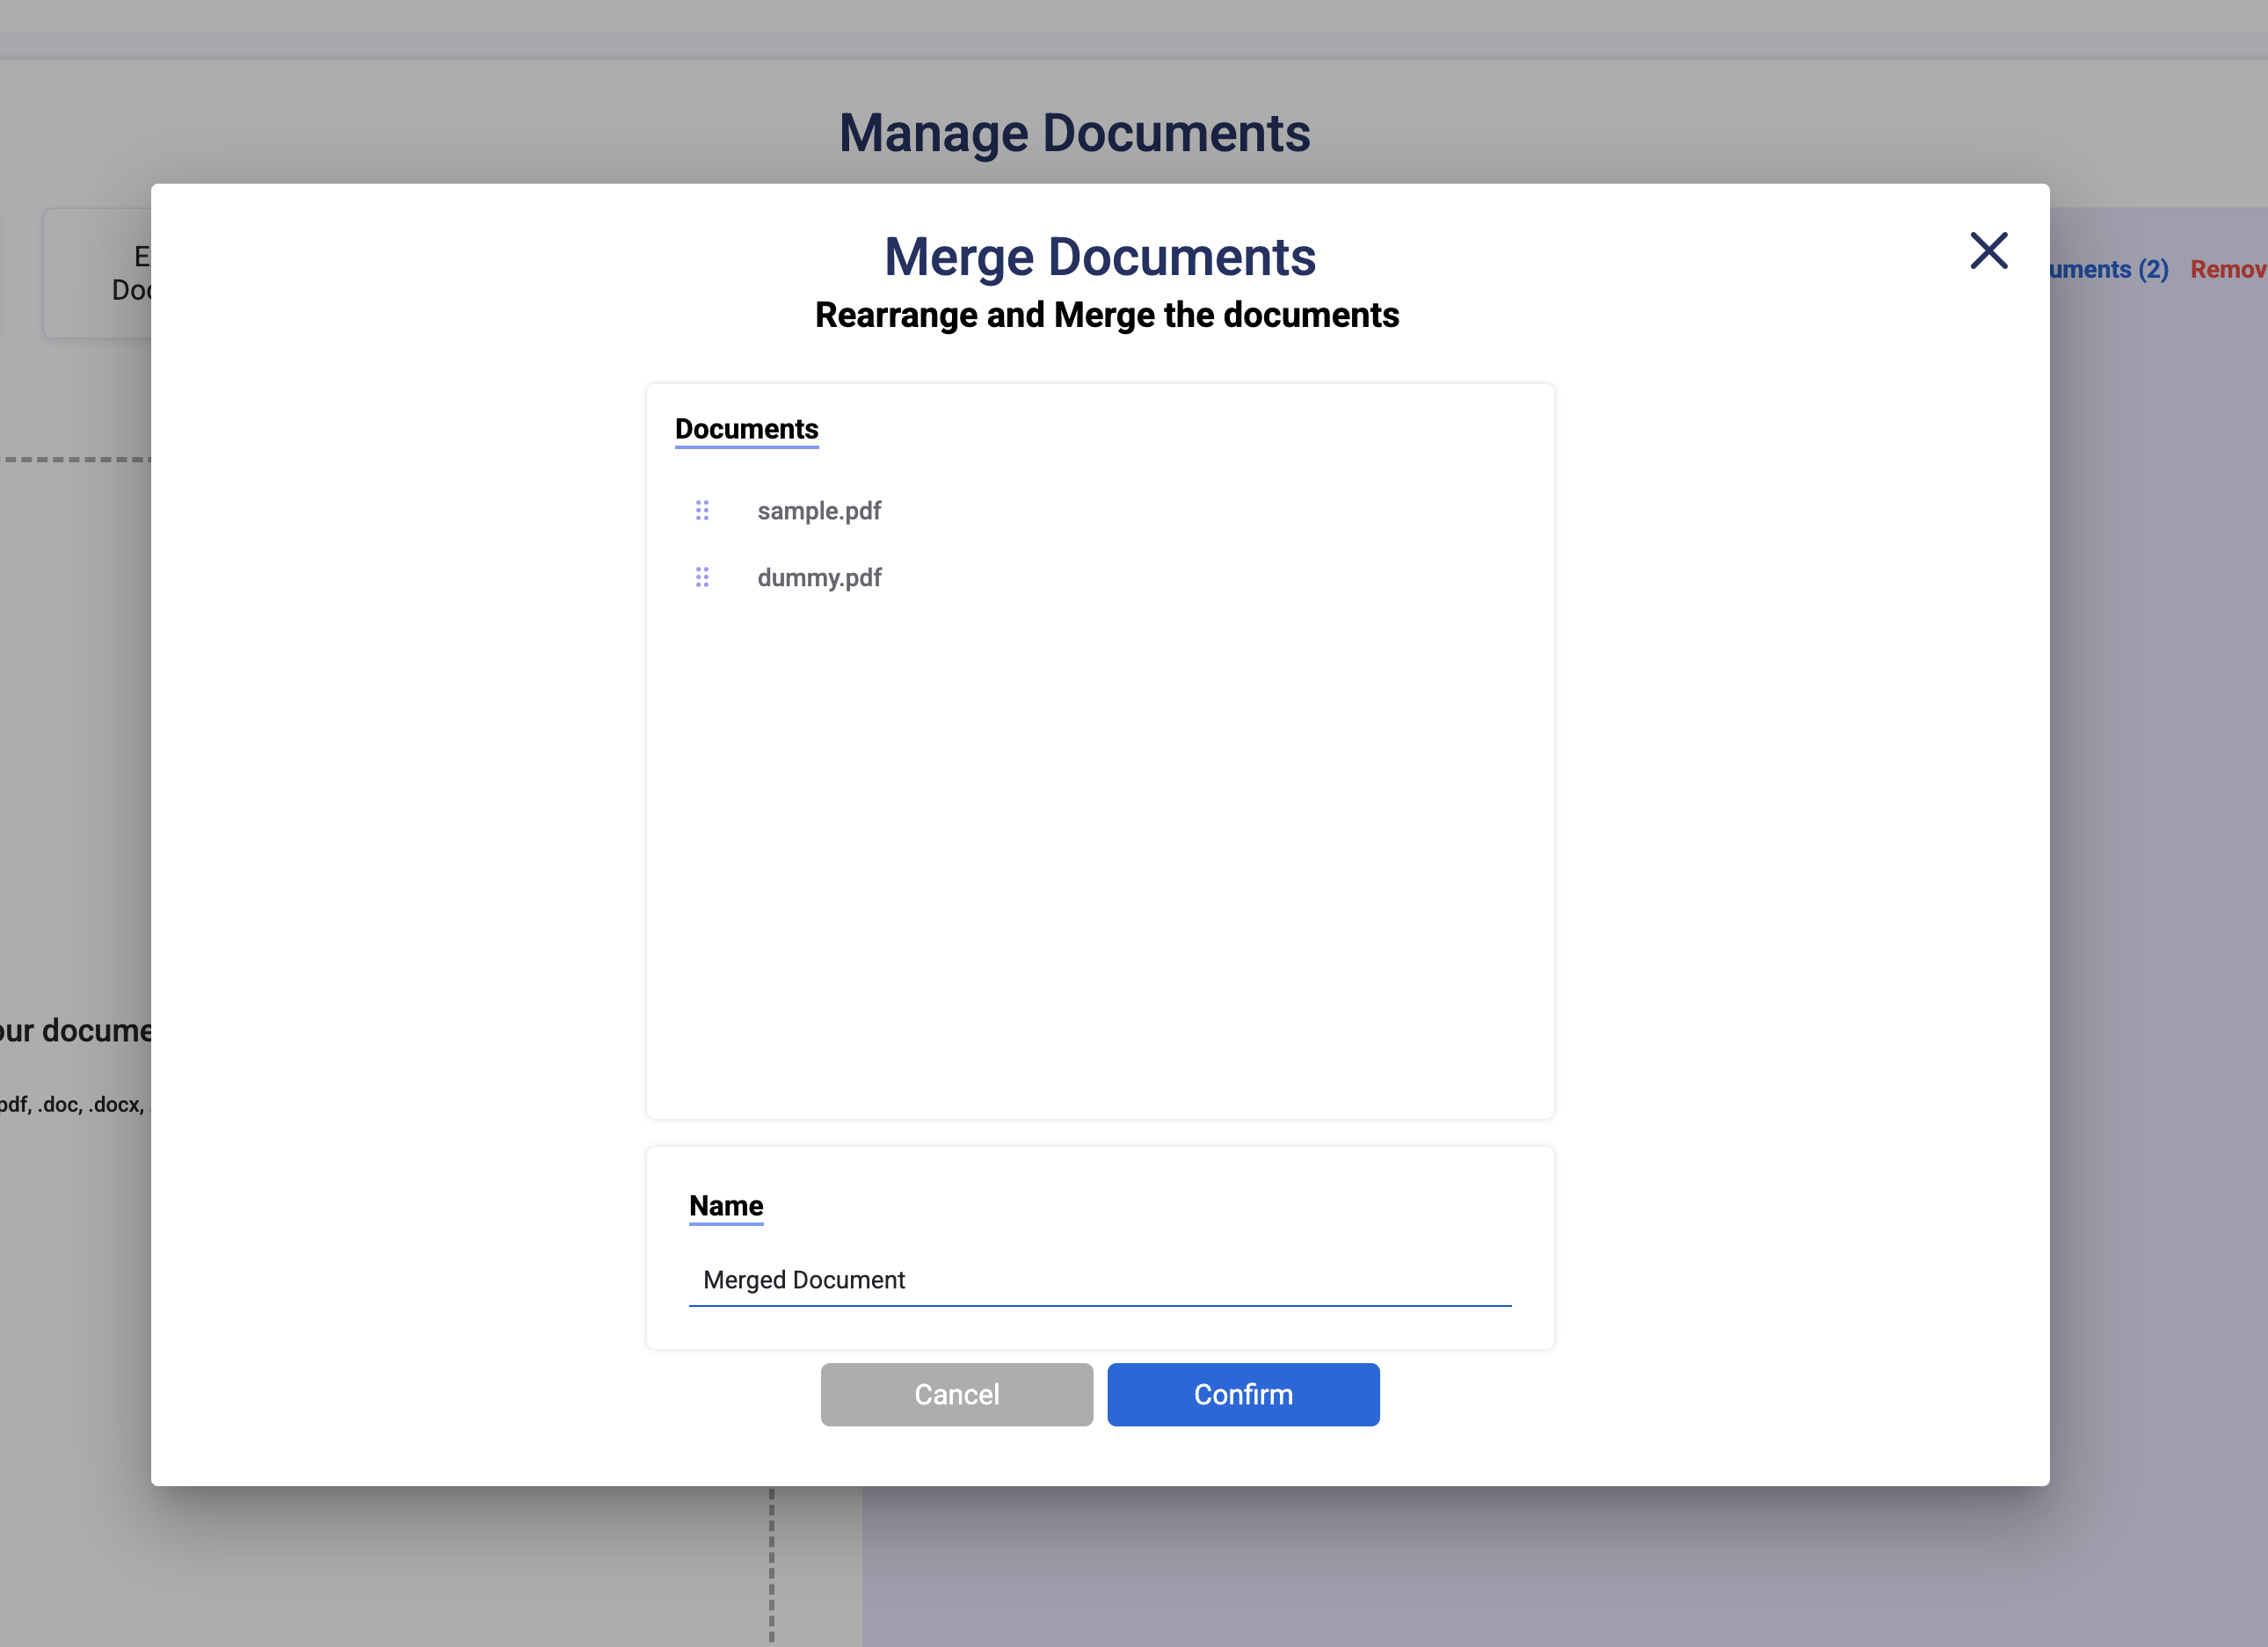
How can a user merge multiple documents during upload?
MSB allows the Custodian users to merge multiple uploaded files into a single document. The user will be able to designate the order of the files in the merged document. The user will also be able to change the name of the merged document. A message will be displayed if the size of the merged document exceeds the allowed upload size.

Contact Us
Great, Thank you!
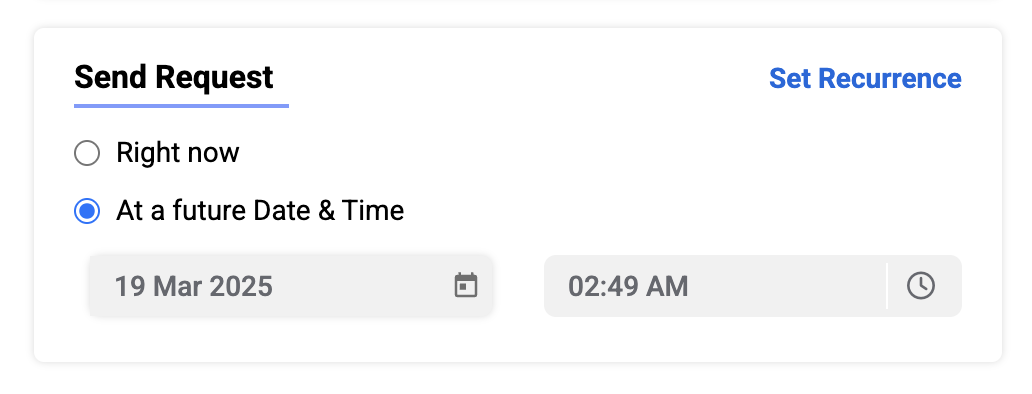
How can a custodian schedule an ePak?
If configured, Custodians may schedule an epak to be sent later. The ePak will be kept in the Custodian’s draft folder until the date arrives. Users will be able to edit and delete a scheduled ePak.
Contact Us
Great, Thank you!
Why do I want to use Workflows?
For situations where users sign similar documents repeatedly, Workflows can improve efficiency. For example, if you typically manage documents signed by an Author and Signatories, you can save the appropriate Workflow States and Signatories to a Workflow. Then, when you receive a new document from the author, you can simply apply the Workflow to the document when you create an ePak. This approach is faster than re-creating Workflows on each new document, however if you choose to you may use the Quick Workflow tool to create a custom workflow every time you upload a document. Quick Workflows are for one-time use and cannot be re-used (however you can use the Workflow menu to save a quick workflow as a workflow template when you are creating your quick workflow). Regular saved Workflows can be re-used and also shared with other Custodians within your organization.
Why should I use Workflows?
For situations where users sign similar documents repeatedly, Workflows can improve efficiency. For example, if you typically manage documents signed by an Author and Signatories, you can save the appropriate Workflow States and Signatories to a Workflow. Then, when you receive a new document from the author, you can simply apply the Workflow to the document when you create an ePak. This approach is faster than re-creating Workflows on each new document.
Contact Us
Great, Thank you!
How do I create a new Workflow?

To create a new Workflow, follow the steps below:
- Click the Templates link in the main navigation panel on top of the application.
- Type a name for the new template in the Workflow Name field.
- Choose the accessibility of your Workflow. You can either make it Public, Private or Group.
- Private – only you may use the workflow
- Public – other Custodians may use the workflow however they will not be able to edit the workflow, only you may edit the workflow.
- Group – Workflow will be available to the Custodian members of your groups
- Add workflow states to the Workflow by clicking the state menu in any present state in the workflow, and choose, Insert above/down to insert a new state.
- For each state, choose one of the following: Sign, Review or Email (Please note, the state actions available to you are configurable and will depend on your instances specific configuration).
- Add recipients to each state by typing the username in the field provided. If you have previously sent an ePak to the recipient, they will appear in your Favorite Users list. If the user does not appear, you may click the Search link to search all users.
- If the state is a Sign state, any recipients will be required to sign or reject the ePak.
- If the state is a Review state, any recipient added will have to review and approve or reject the ePak, however their signature will not be required.
- If the state is an Email state, it will email a copy of the ePak document(s) to any recipient added to that state. The document may or may not have all signatures completed, as it will send them out however they are when they reach that state.
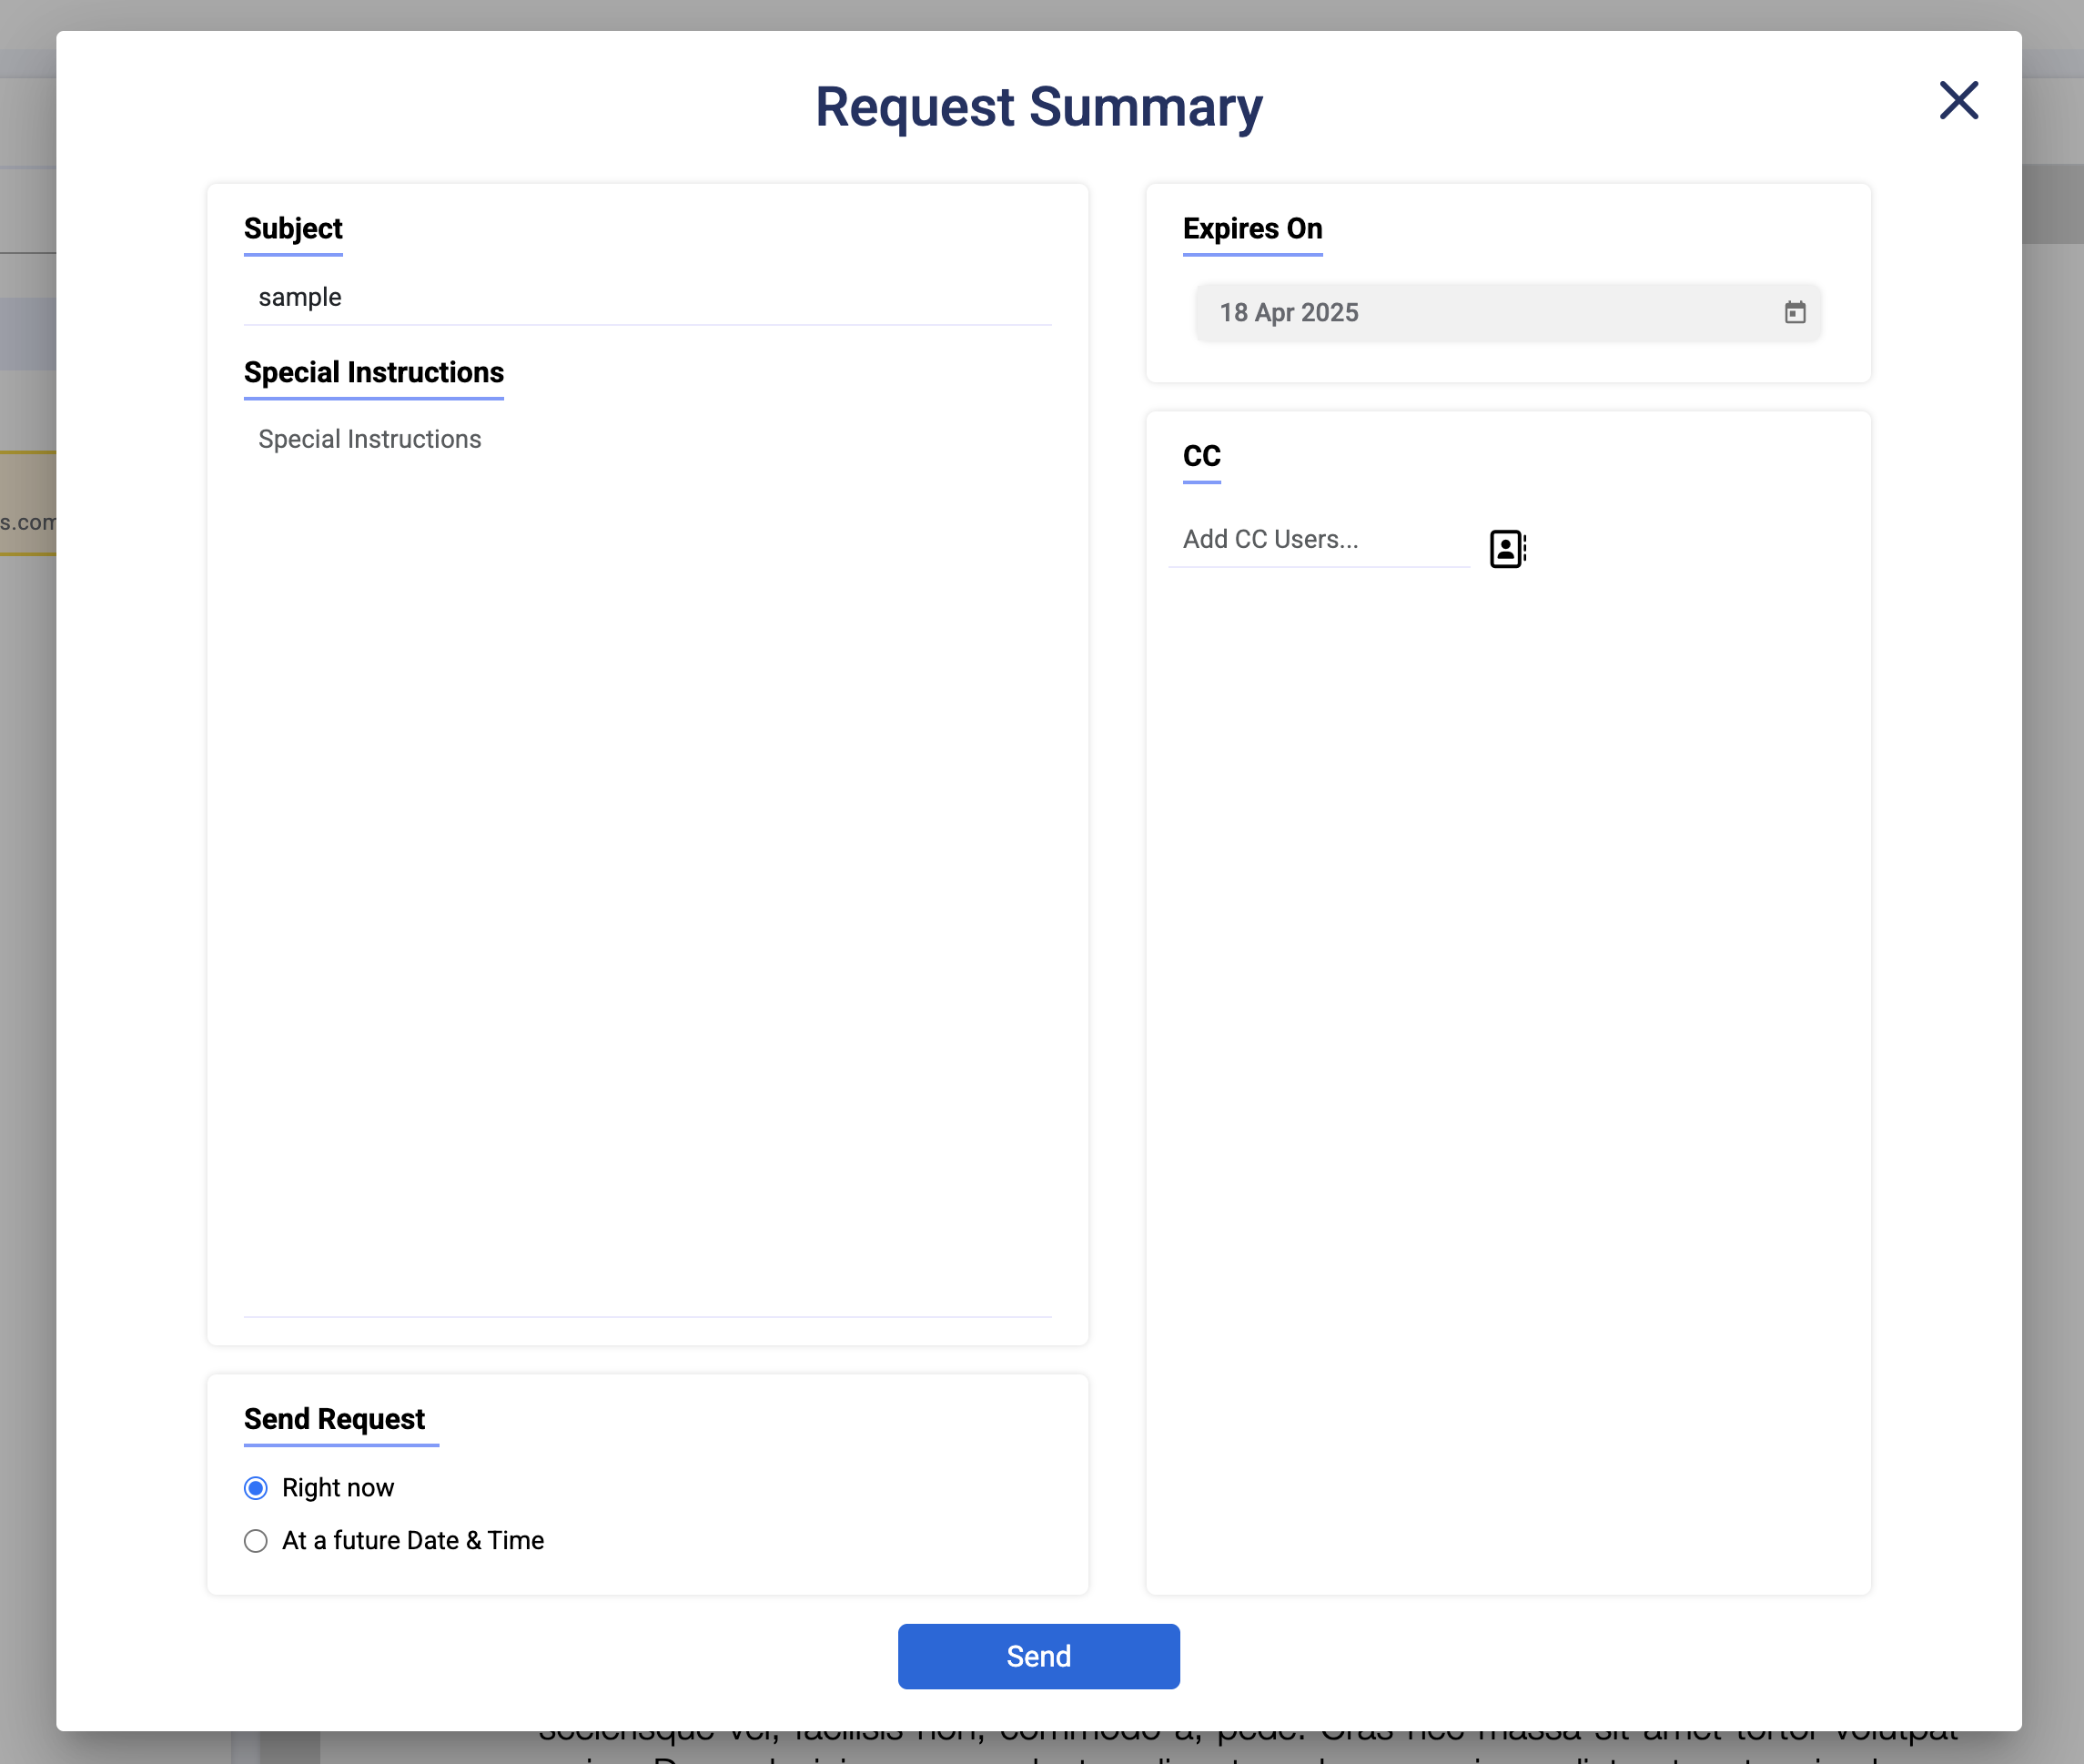
- You may also add minimum users to review and sign states, CC, Subject, Special Instructions and Tags to your workflow. These items are optional and not required.
- If configured for your instance, you will be able to choose a different certificate policy for each state in your workflow from the drop-down menu. By default, the ePak level signing policy will be applicable to all workflow states unless selected otherwise.
Note: If both electronic and digital signing policies have been configured for your instance, you can choose between both for different workflow states however selecting a digital policy for any workflow state will prevent you to use an electronic policy for any state after that.
- When finished adding States and Signers, click the Save button in the upper right corner. It saves the workflow template and displays a confirmation message to tell you the workflow has been created.
- This workflow will then be available in the list of existing Workflows on this page, the Compose page and the Dashboard page.
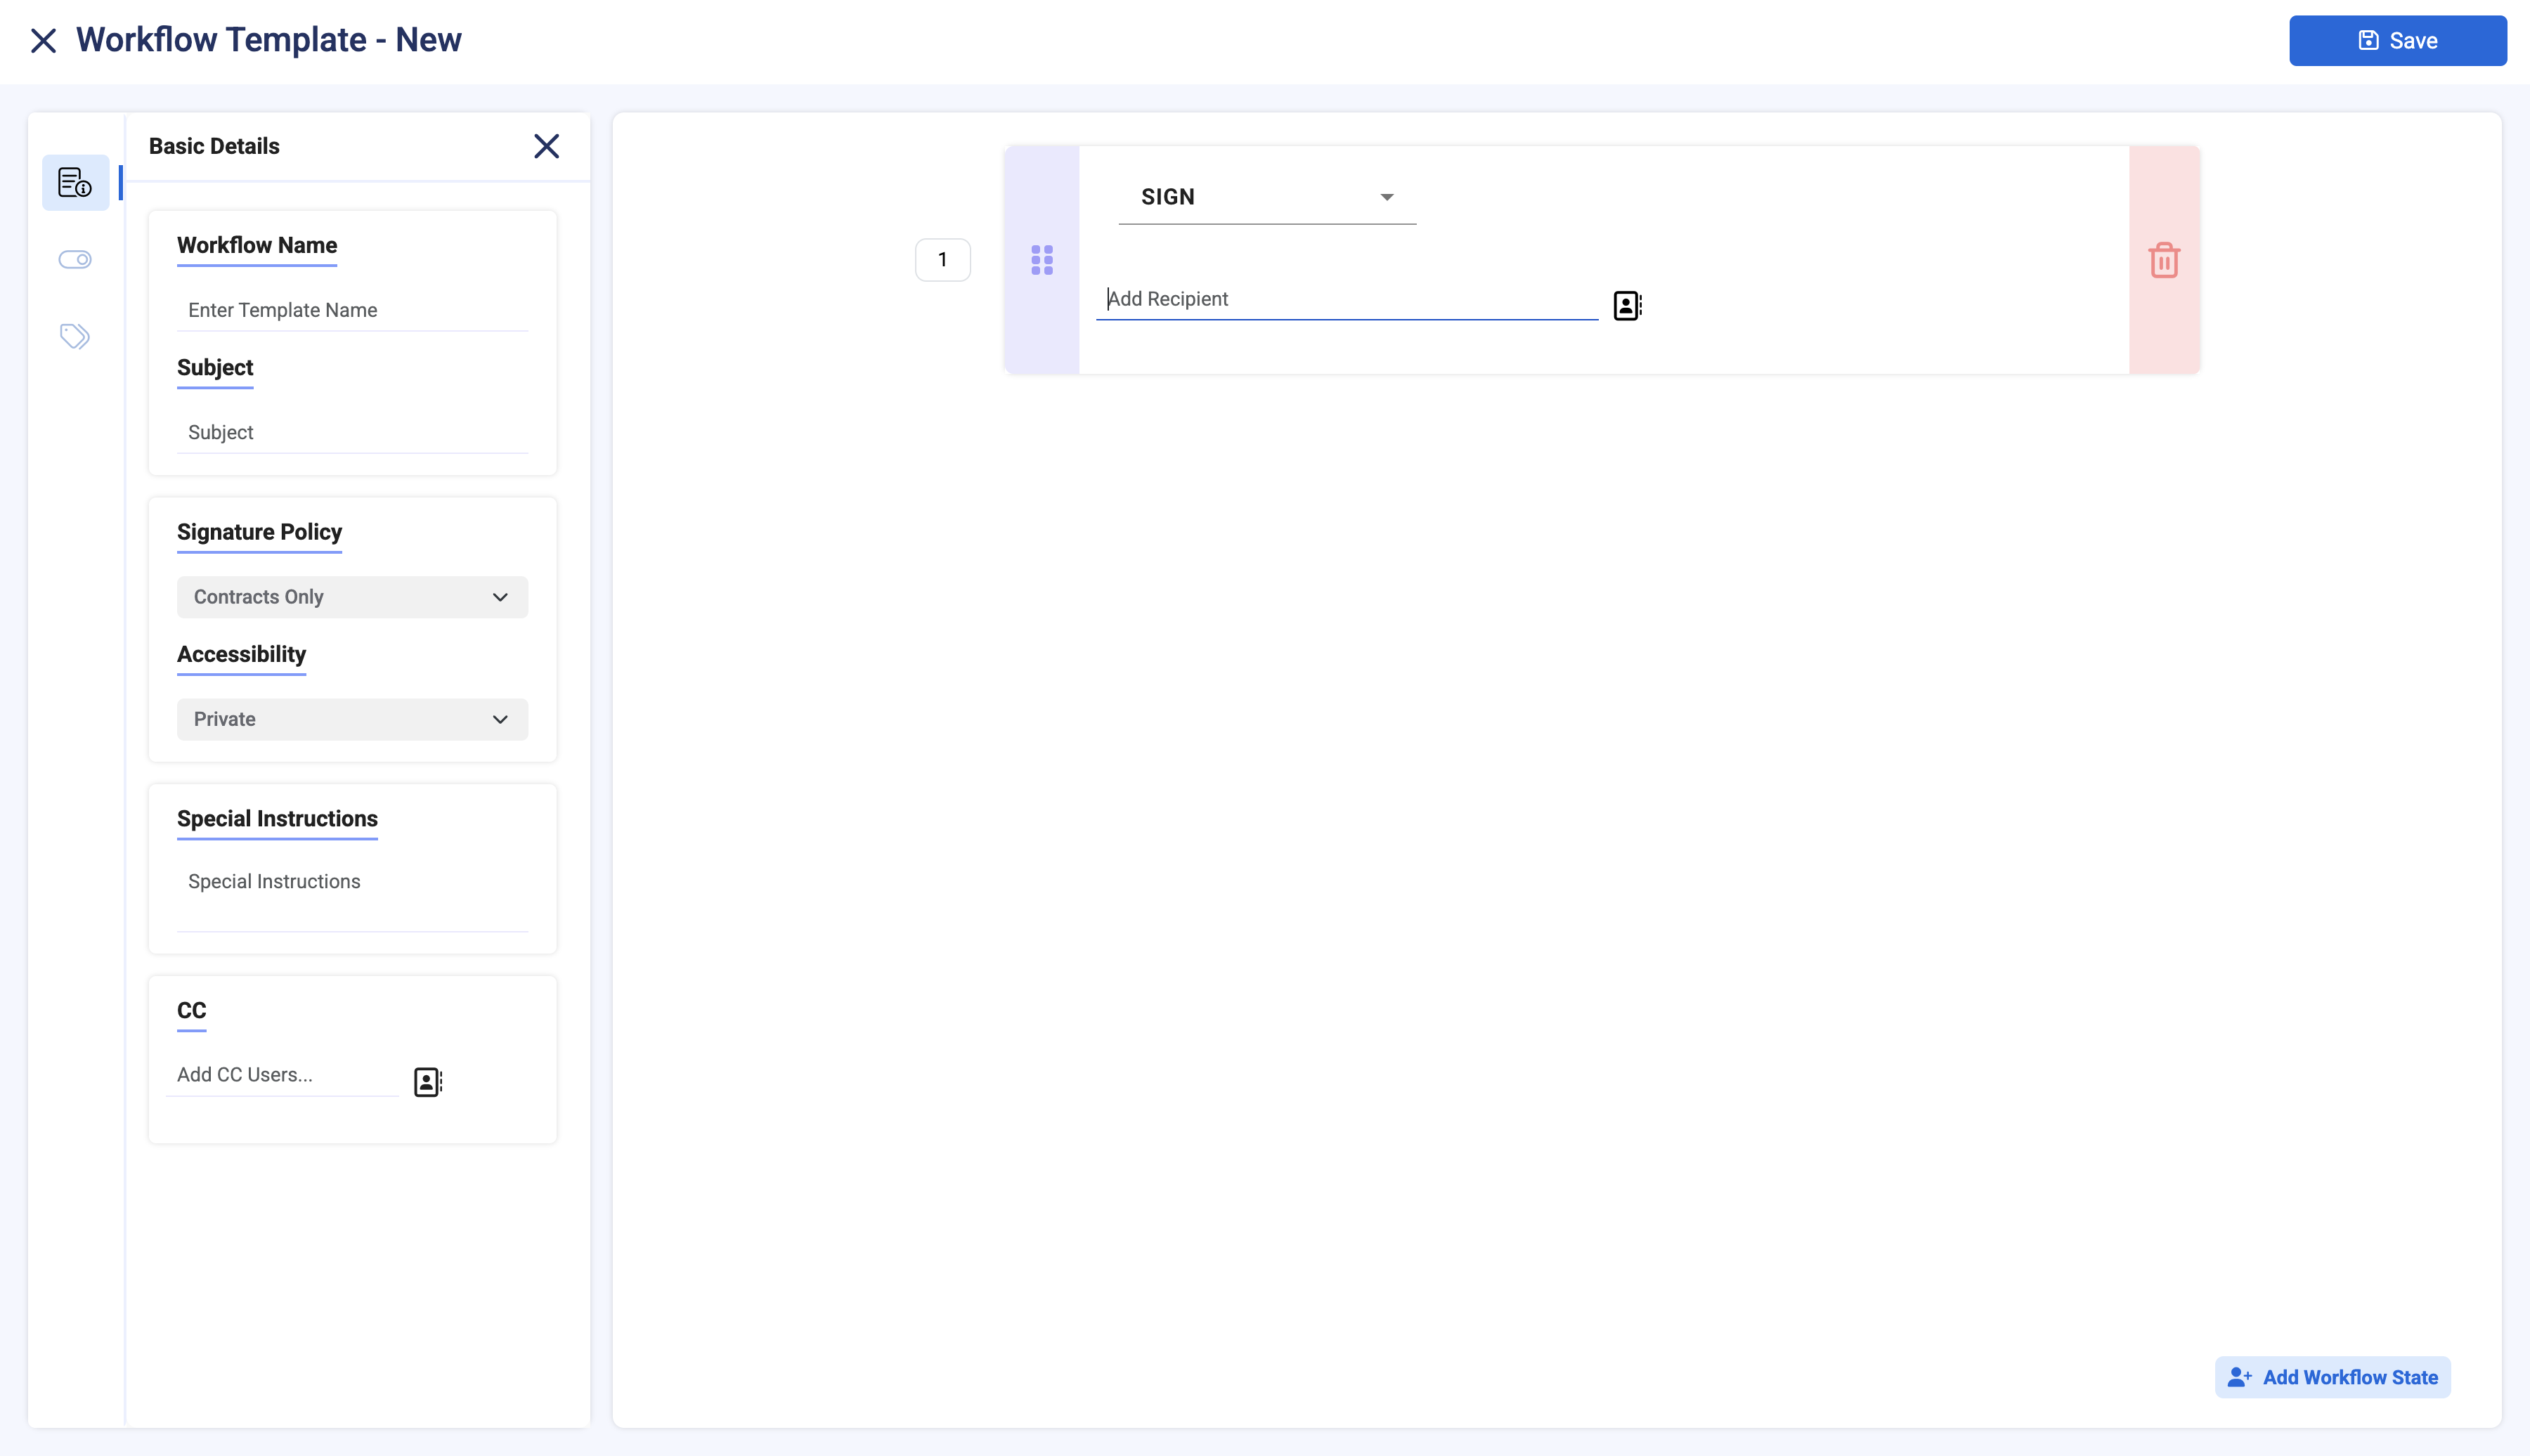
How do I create a new Workflow?
To create a new Workflow, follow the steps below:
1) Click the Templates link in the main navigation panel. On the templates page, Click on Create button.
2) Type a name for the new template in the Workflow Name field, Signing Policy and Choose the accessibility of your Workflow. You can either make it Public, Private or Group.
3) Add workflow states to the Workflow by clicking on “Add Workflow State”. For each state, choose one of the following: Sign, Review or Email. Add recipients to each state by typing the username in the field provided.
4) You may also add minimum users to review and sign states, CC, Subject, Special Instructions and Tags to your workflow. These fields are optional.
5) If configured for your instance, you will be able to choose a different certificate policy for each state in your workflow from the drop-down menu. The default signing policy will be applicable to all workflow states unless selected otherwise.
6) When you finish adding States and Signers, click the Save button in the upper right corner. This workflow will then be available in the list of existing Workflows on this page and the Compose page.