There is an “Attach a file” tag on the ePak sent to me, what do I need to do?
If the ePak custodian has placed an “Attach a file” tag on your ePak document, you may click it to attach a document to the ePak. Simply click the tag, and upload window will appear. Navigate to the file you wish to attach and select it. Click Upload, then click Next. The file will be attached to the ePak and will be visible to all other recipients in the ePak workflow.

Contact Us
Great, Thank you!
There is an “Attach a file and Sign” tag on the ePak sent to me, what do I need to do?
If the ePak custodian has placed an “Attach a file and Sign” tag on your ePak document, you may click it to attach a document to the ePak and Sign it. Simply click the tag, and upload window will appear. Navigate to the file you wish to attach and select it. Click Upload, then click Next. Then drag and drop a Signature tag onto the document to place your signature or turn Auto-Append to On to add your signature at the end of the document. Then follow the steps on the screen to sign the document and complete the ePak. The signed file will be attached to the ePak and will be visible to all other recipients in the ePak workflow.
Contact Us
Great, Thank you!
Two Factor Authentication (In-Person Signing)
Does MSB system support any other method for verification other than email in IN-person signing feature?
MSB Application offers 2FA while performing In-person signing where the signer needs to enter the OTP sent on the Mobile number or email for to completing the signing process.
Steps-
- Signer opens the easy signing link
- Accepts the Terms and Condition
- Tap or click over start
- Draws the signature
- Confirms the OTP send either on email or over Registered mobile
Two-Factor Authentication on Login
Other than email address what are the ways we can implement for logging into the application?
Other than email address what are the ways we can implement for logging into the application?
Two Factor Authentication (In-Person Signing)
Does MSB system support any other method for verification other than email in IN-person signing feature?
MSB Application offers 2FA while performing In-person signing where the signer needs to enter the OTP sent on the Mobile number or email for to completing the signing process.
Steps-
1) Signer opens the easy signing link
2) Accepts the Terms and Condition
3) Tap or click over start
4) Draws the signature
5) Confirms the OTP send either on email or over Registered mobile
Two-Factor Authentication on Login
Other than email address what are the ways we can implement for logging into the application?
MSB provides 2FA during login where the customer needs to enter the OTP sent on the chosen medium (Email/Mobile number) before login. This feature helps in providing additional security while logging in to the application.
Contact Us
Great, Thank you!
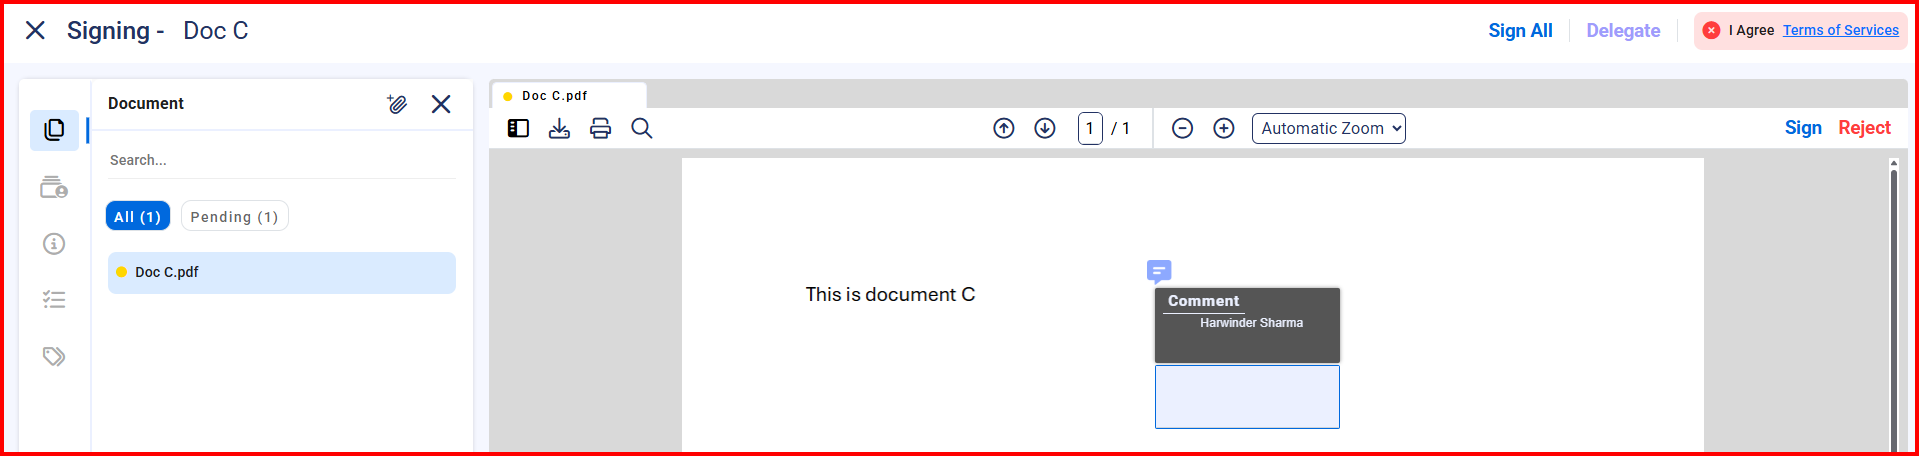
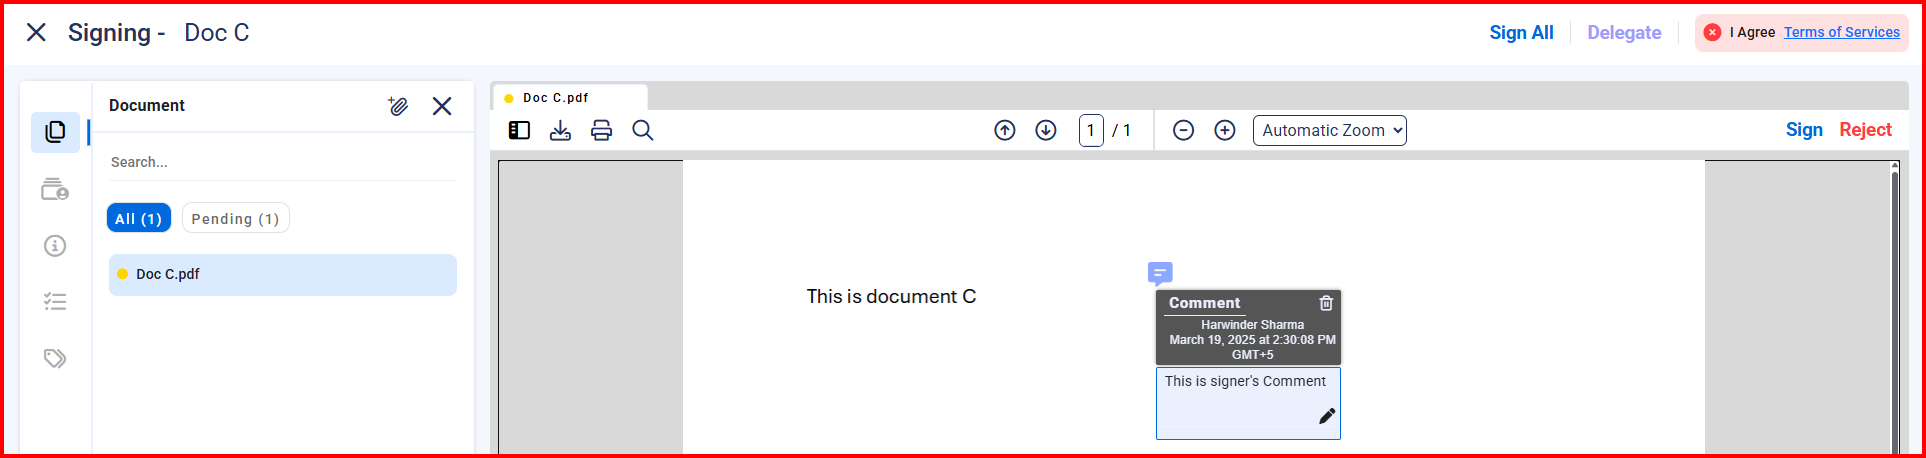
How do I add comments to an ePak document when I am signing it?
You might wish to add comments when you are signing an ePak document. To add comments, the steps are as follows:
- Log into your account.
- Visit the ePaks page or Dashboard page.
- Select the ePak you wish to sign and the ePak will open in the ePak preview panel.
- When reviewing the document, find the place where you wish to add a comment.
- Right click the document where you wish to add a comment (a comment pop up window will appear).

- In the comment pop up window, enter your comment and click OK.

- Repeat steps 6-7 for any additional comments that you would like to add. You may edit/delete comments that you have added to the document.

- Finish signing the document as usual.
How do I add comments to an ePak document when I am signing it?
To add comments, the steps are as follows:
1) Log into your account.
2) Select the ePak you wish to sign and the ePak will open in the ePak preview panel.
3) Right click the document where you wish to add a comment (a comment pop up window will appear).
4) In the comment pop up window, enter your comment.
5) Repeat steps 3-4 for any additional comments that you would like to add.
6) Finish signing the document as usual.
Contact Us
Great, Thank you!
What if I do not want to sign an ePak?
You might be asked to sign an ePak, but you do not want to do so. Maybe you require some changes to the document before signing it. When you want to reject a signature request, the steps are as follows:
- Log into your account.
- Visit the ePaks page.
- Click on the Inbox.
- Select the ePak.
- Review the ePak in the ePak preview panel.
- Click Reject button on the top of the ePak preview.
- Fill in the form that pops up, including your login name and password.
- If the document is using a Safe Certificate you will need to enter your Universal Identification Service username and password, your one-time password, and grant permission. You may select a rejection reason or type it and provide comments describing why you are rejecting the document.
- If the document is using Safe eToken, keep your SAFE eToken device plugged in while you reject it and then you will need to enter your SAFE Pin and an optional comment.
- If the document is using a different policy, enter in the requested information, and any comments describing why you are rejecting the document.
- Click the Reject button
- It displays a confirmation message that the ePak is rejected successfully.
- Click Ok.
- It rejects the ePak and notifies the custodian. It then moves this ePak to your Rejected folder. You can find all your rejected ePaks in there.
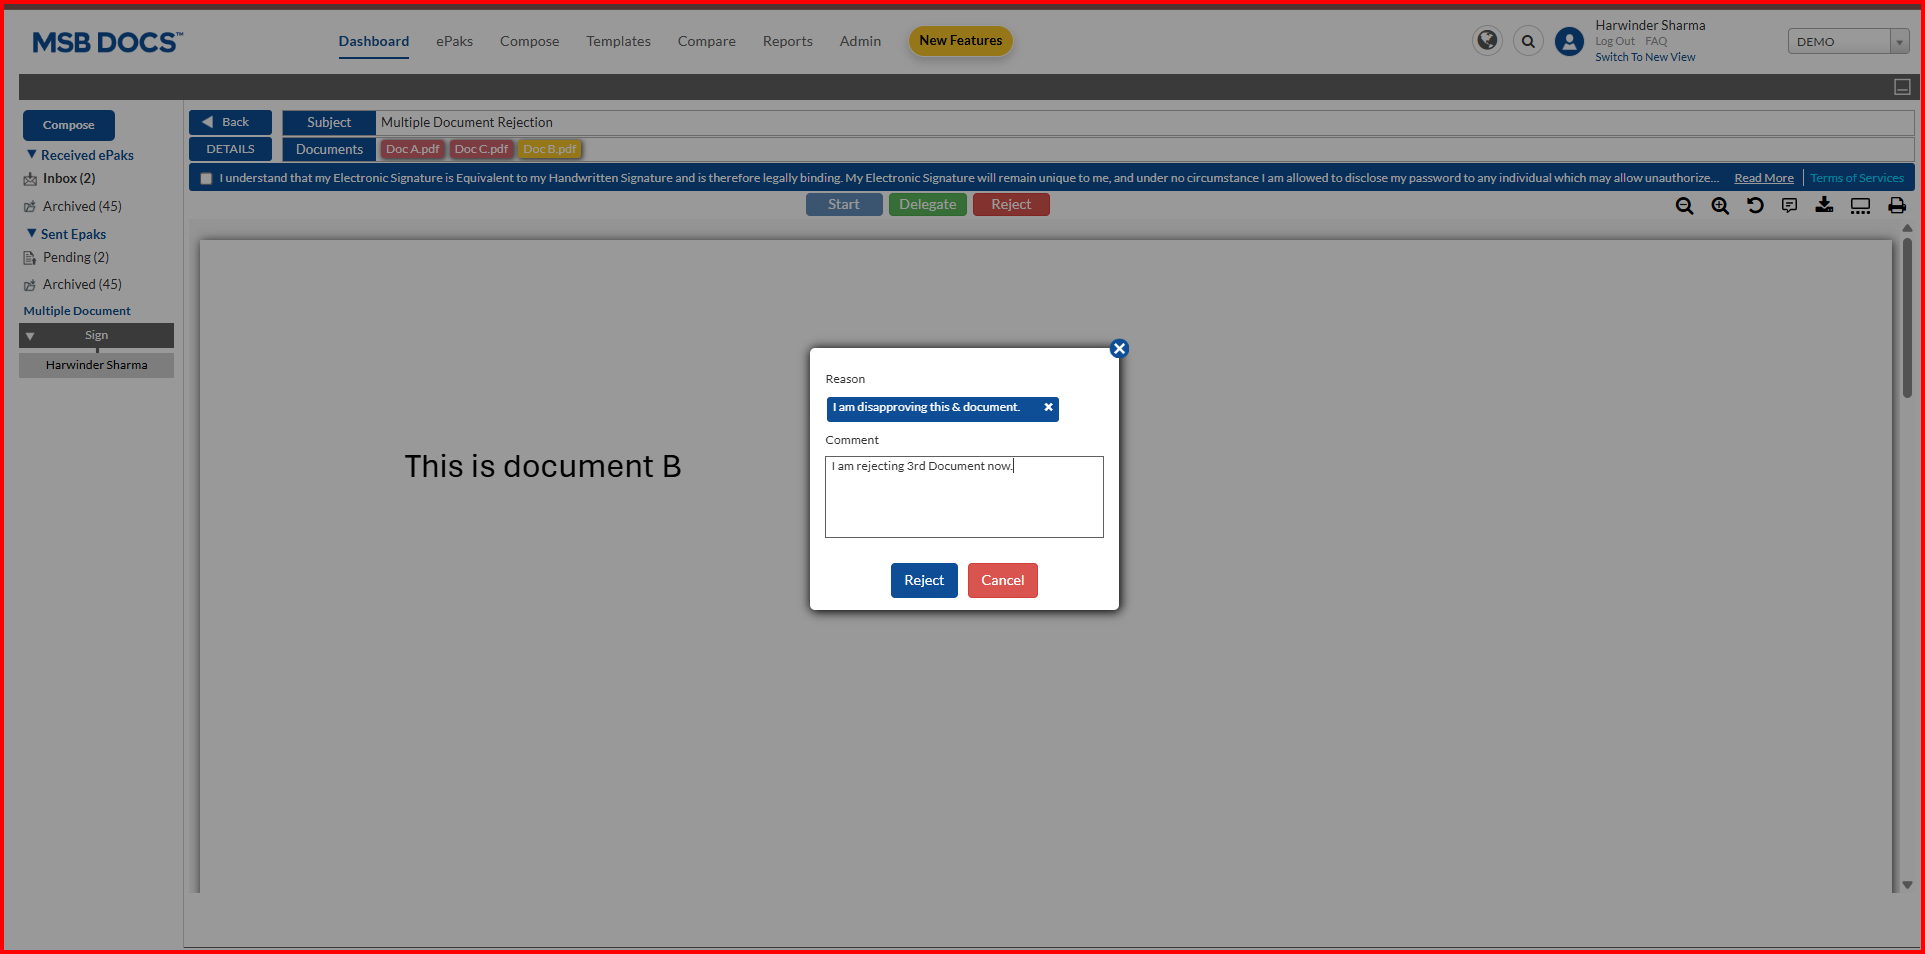
Can I reject an ePak?
When you want to reject a signature request, the steps are as follows:
1) Log into your account and select the ePak.
2) Review the ePak in the ePak preview panel.
3) Click the Reject button on the top of the ePak preview.
4) Select the Rejection reason in the Reject Documents pop-up window, and any comments describing why you are rejecting the document.
5) Click the Confirm button
6) A confirmation message is displayed that the ePak is rejected successfully.
7) The custodian will be notified and the ePak moves to the Rejected folder.
Users will receive an email notification on ePak deletion or rejection even if their action is already completed.
Contact Us
Great, Thank you!
Can a Signer reject multiple documents in an ePak one after the other?
MSB allows signers to reject multiple documents in an ePak one after another. After rejecting a document, the user will automatically move on to the next document that needs an action. The user will be asked to enter the Rejection reason and comment during document rejection.
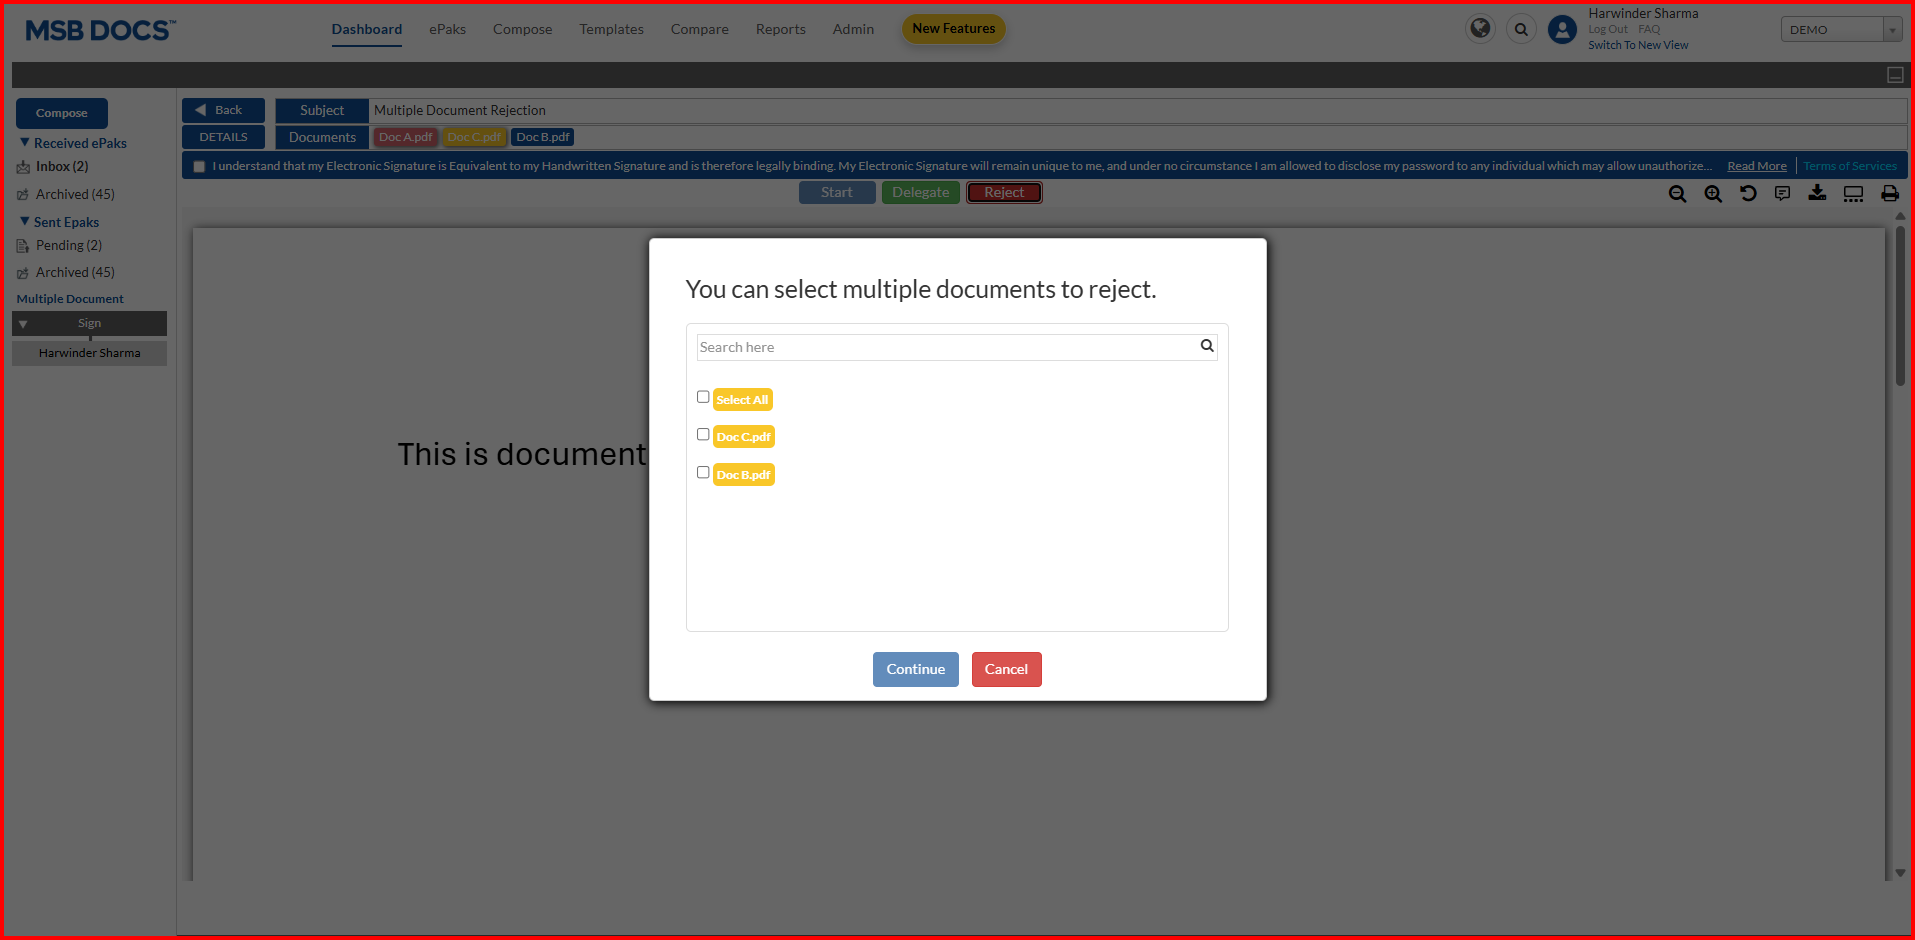


Contact Us
Great, Thank you!
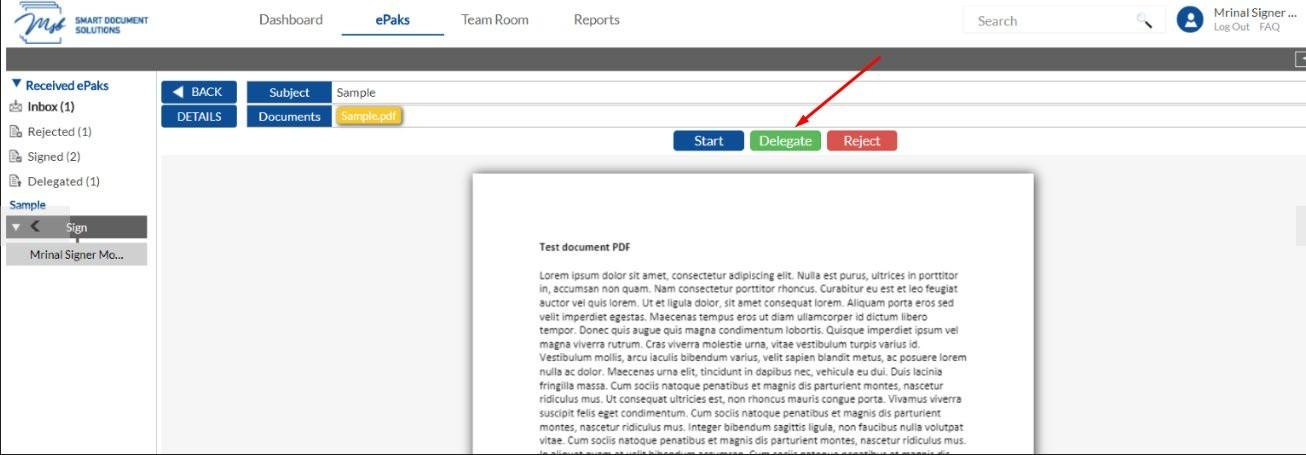
Can I delegate signing the ePak to another Signer?
Yes, if this feature has been configured for your instance – you may delegate signing the ePak to another Signer. The custodian of the ePak may also control whether or not his ePak can be delegated to another signer. As a singer, you might be asked to sign an ePak, but may wish to delegate it to someone else to sign (if someone else is the appropriate signatory, or for any other reason).
- When you are viewing the ePak in your Inbox, click the Delegate button that is located on the panel just above the ePak preview.
- The Delegate ePak form will appear.
- Enter the email address/username of the signer you wish to delegate the ePak to and you may enter a message in the field provided.
- If the ePak is being delegated to a non-registered user, you will need to enter the email address, first and last name of the user.

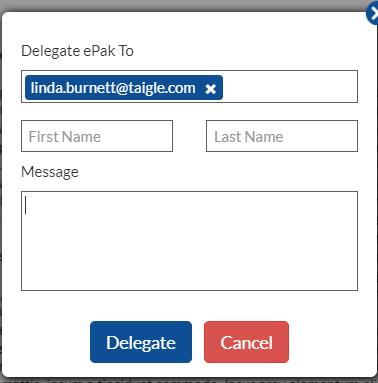
- Click the Delegate button. It will not allow you to delegate to a Signer that is already a recipient of the ePak.
- If the delegation was successful, it displays a confirmation message that ePak delegated successfully.
- Click Ok.
- It then moves this ePak to your Delegated folder. You can find all your delegated ePaks in there.
- It will send an email to the new Signer.
- If the signer exists, the ePak will automatically be added to the user’s Inbox.
- If the signer does not exist, the signer will receive an email with an invite to create an account and access the delegated ePak.
- Once the new user creates an account, the document will be added to the new user’s inbox. Until then, it will still appear in your Delegated folder, and the status will be “Pending”, and you will not be able to sign the document. You may cancel the delegation while the status is still ‘Pending.’
Can I delegate signing the ePak to another Signer?
Yes, if this feature has been configured for your instance – you may delegate signing the ePak to another Signer. The custodian of the ePak may also control whether his ePak can be delegated to another signer or not. As a signer, you might be asked to sign an ePak, but may wish to delegate it to someone else to sign (if someone else is the appropriate signatory, or for any other reason).
1) When you are viewing the ePak, click the Delegate button that is located on the panel just above the ePak preview.

2) The Delegate ePak form will appear.Enter the email address/username of the signer you wish to delegate the ePak to and you may enter a message in the field provided.
If the ePak is being delegated to a non-registered user, you will need to enter the email address, first and last name of the user.
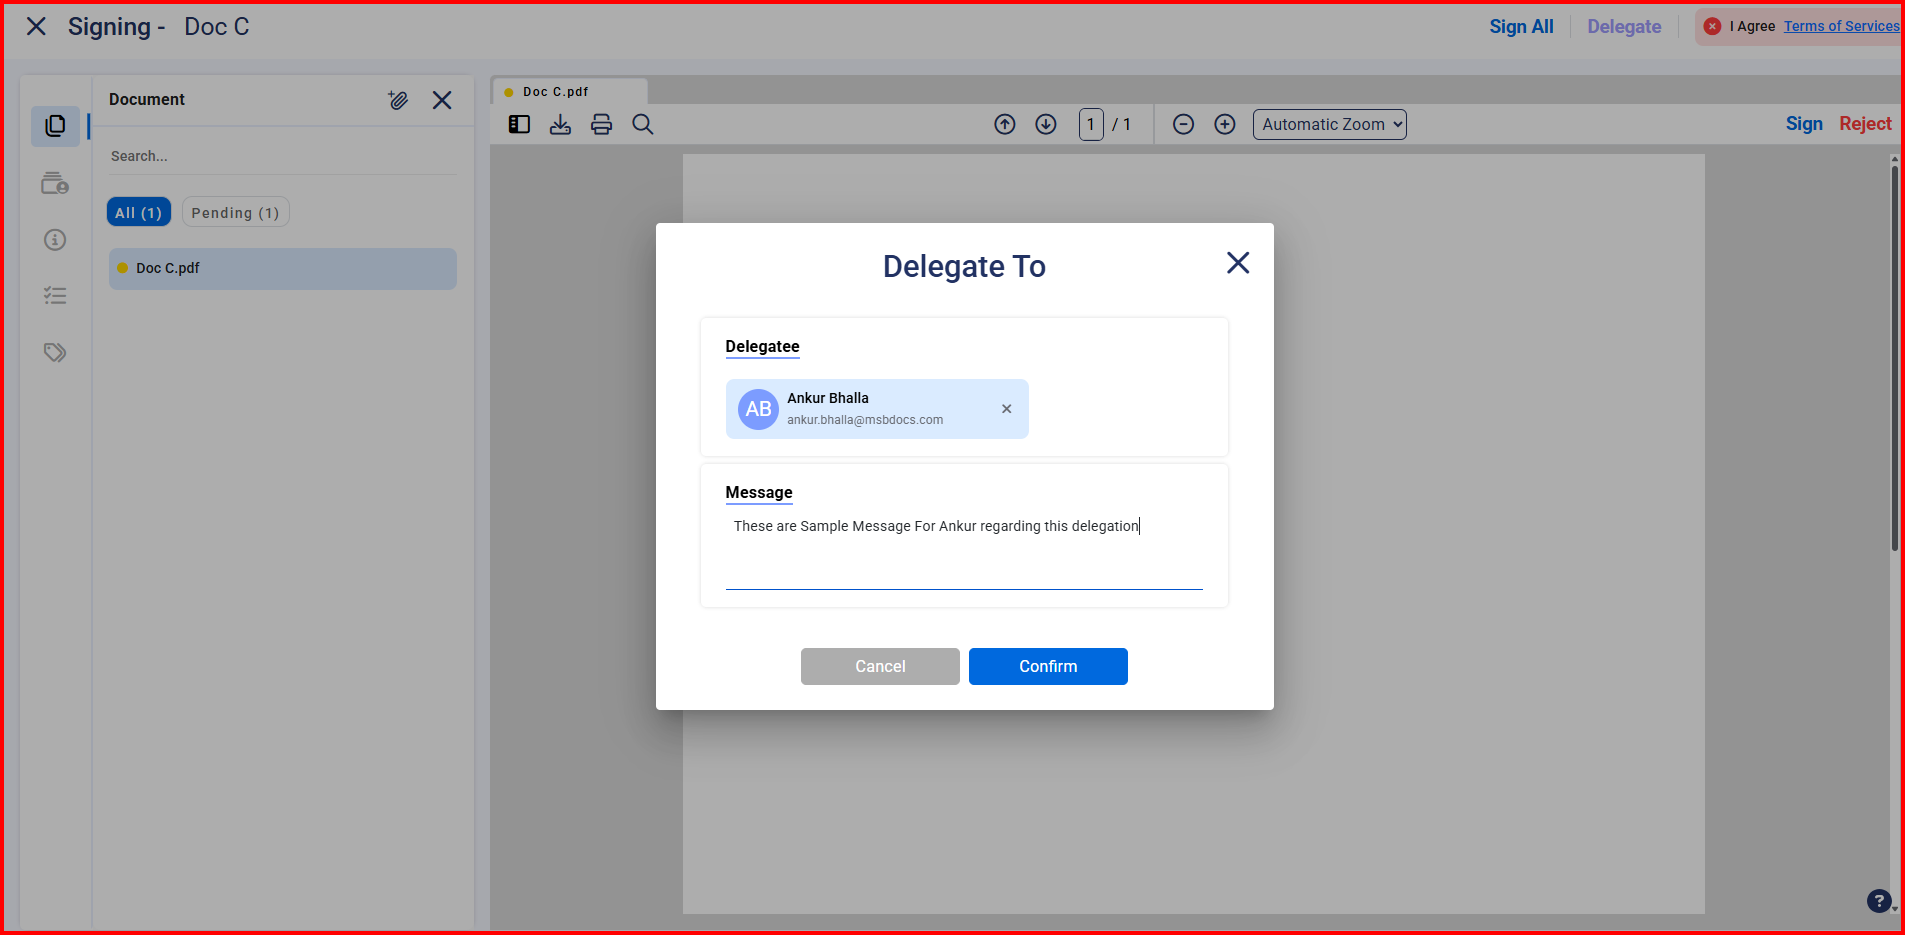
3) Click the Confirm button. It will not allow you to delegate to a Signer that is already a recipient of the ePak.
4) If the delegation was successful, it displays a confirmation message that ePak delegated successfully.
5) It then moves this ePak to your Delegated folder. You can find all your delegated ePaks in there.
6) It will send an email to the new Signer.If the signer exists, the ePak will automatically be added to the user’s Inbox.If the signer does not exist, the signer will receive an email with an invite to create an account and access the delegated ePak.
Users added in multiple states can delegate a single state to other recipients.
MSB will allow a recipient added in multiple states of an ePak workflow to delegate the current state to other recipient without affecting future workflow states.
Contact Us
Great, Thank you!
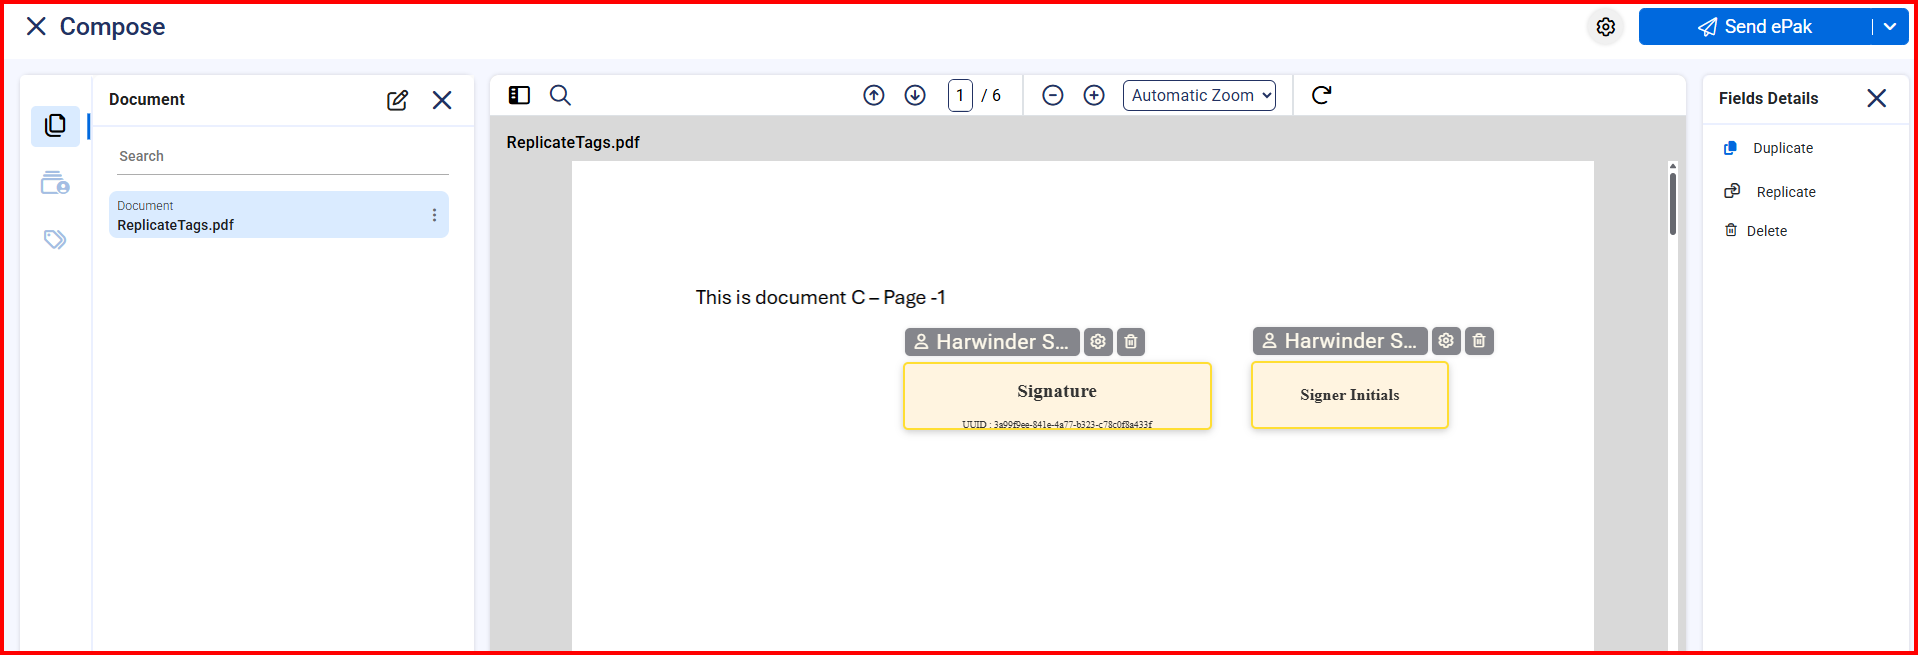
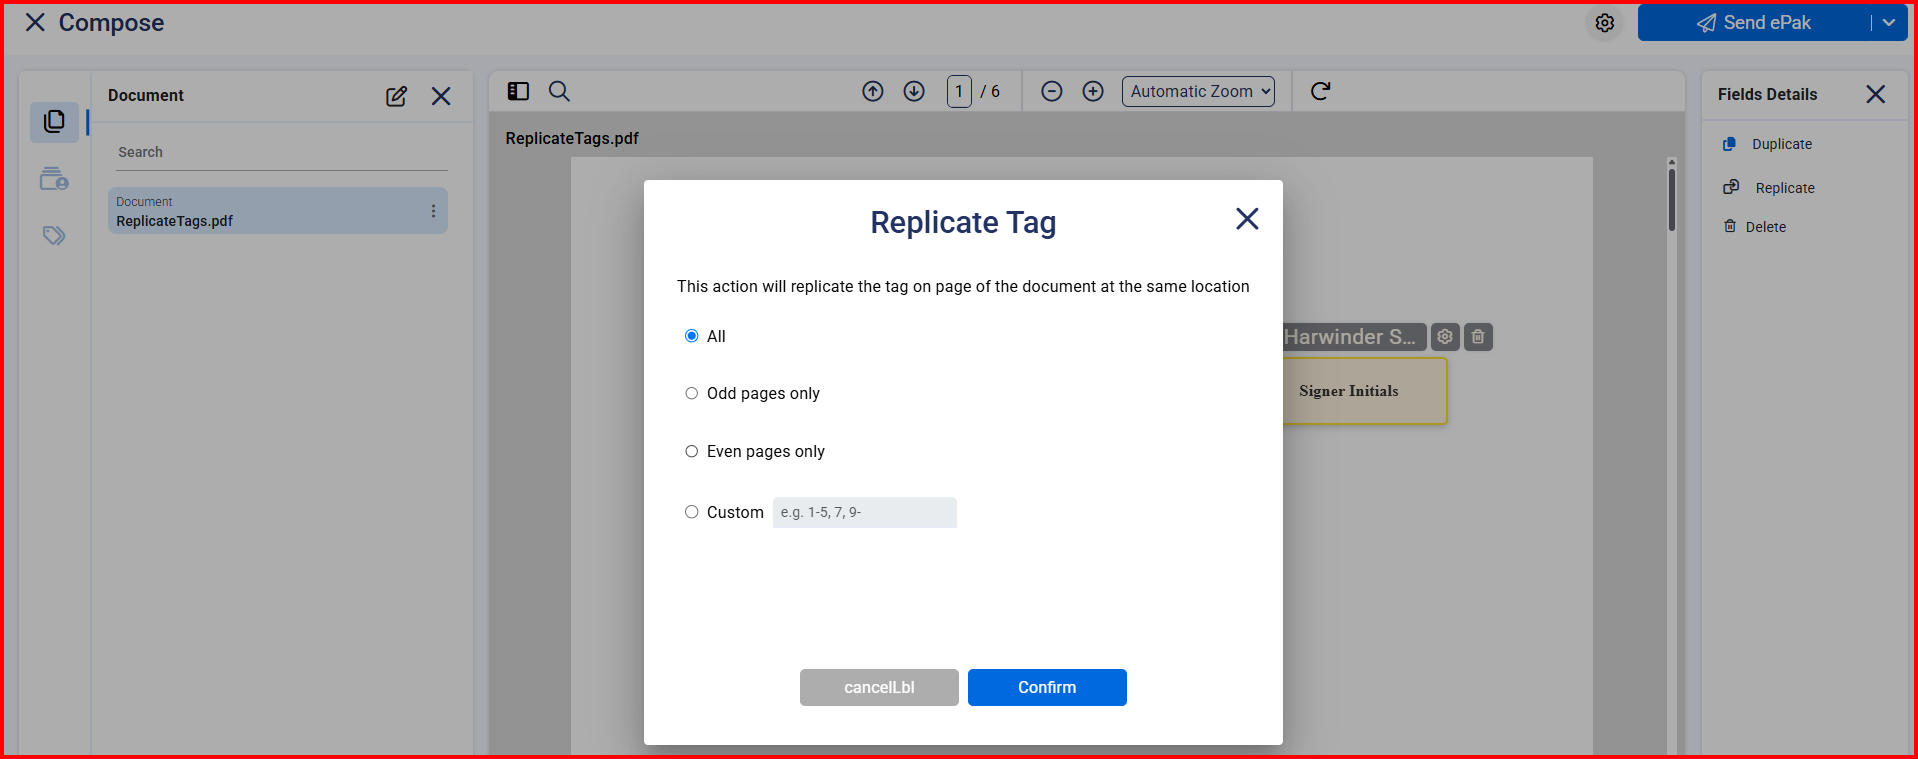
Can I Replicate Signature/Initials Tag on all Pages
A user with custodian role can replicate a dropped signature/initials tag on all the other page of the document. It will save the user time and effort to drop signature on each single page of the document.

This will give user an alert that if he/she wants to replicate the given tag on all other pages at same location.

Can I Replicate Signature/Initials Tag on all Pages?
A user with custodian role can replicate a dropped signature/initials tag on all the other pages of the document. It will save the user time and effort to drop signature on each single page of the document.
When you drop a Signature tag, select the gear icon to view the Replicate button.
When you click on Replicate, the user will be asked if they wish to replicate the tag on All, Odd Pages Only, Even Pages Only or Custom. Users can use a hyphen to specify the range of pages to apply the tag and a comma to list individual pages.Select any option and click on Confirm.
Contact Us
Great, Thank you!
Is there a deadline for signing an ePak?
The Document Custodian may have set an expiration date on an ePak that they’ve sent to you. You can view the expiration date in your Inbox. If the expiration date passes, you will no longer be able to access and sign the ePak.
If the Document Custodian chose not to set an expiration date, then by default you have 30 calendar days to sign the ePak. After 30 days, MSB deletes the ePak, whether it is signed or not. This 30-day Retention period may differ depending on your Institution’s configuration at the time of deployment. Check with your Administrator to see if your Institution is not using the 30-day default period.
Note: MSB can now be configured to set expiration and retention dates for an ePak either from the last action date or the ePaks create date. This is a system level configuration and cannot be controlled by individual users.
Contact Us
Great, Thank you!
How do I sign an ePak?
Signing an ePak involves selecting the ePak to sign, reviewing it, adding any desired comments, and then applying your electronic and digital signatures to it. You may access your ePaks either through the ePaks link on the top navigation panel or from the ePak folders on your Dashboard.
The steps are listed below.
- Log into your account.
- Visit the ePaks page or Dashboard page.
- Click the Inbox.
- Select the ePak you wish to sign and the ePak will open in the ePak preview panel.

- Review the ePak document(s) in the ePak preview panel.
- Click the Start button. Signature tags will appear. A blue arrow will point to the first tag that needs your attention. Click on the current tag to complete it. Then click the Next button at the bottom of the screen to move to the next tag. The blue arrow will point to the next tag. (Pressing the Previous button will move the screen and the blue arrow back to the previous tag). Once all tags have been completed, click the Finish button at the bottom of the screen.
Note- If the document contains no fillable tag but only a signature tag(s), you will see a ‘SIGN’ button instead of the ‘START’ button. You must click on the sign button to automatically apply your signature. This will be applicable for all policies configured for your instance.


- If a pop up appears, fill out the fields in the form.
- If the ePak is using a Safe UIS you will need to enter your Universal Identification Service username and password, a one-time password, and grant permission to use your certificate to sign on your behalf (Your Safe credentials may differ from your app credentials. Your SAFE credentials must be setup separately via the SAFE-BioPharma Verizon Universal Identification Services (UIS) system. Contact your company’s representative for information and help to set up your SAFE credentials if you have not already done so). Once you have completed authentication through the Verizon Universal Identification Service, you may select a Signing reason or enter a free text signing reason (if configured), enter an optional comment and agree to the terms & condition of signing.
- If the ePak is using Safe eToken, your SAFE eToken device must be plugged in while you apply signatures and then you will need to enter your SAFE Pin, an optional comment and agree to the terms & condition of signing.
- If the ePak is using an Internal Certificate, enter your username, certificate PIN and agree to the terms & condition of signing. You may enter an optional comment. (If you do not have an Internal Certificate, go to your Profile page and request one by clicking the Generate CSR link to request one).
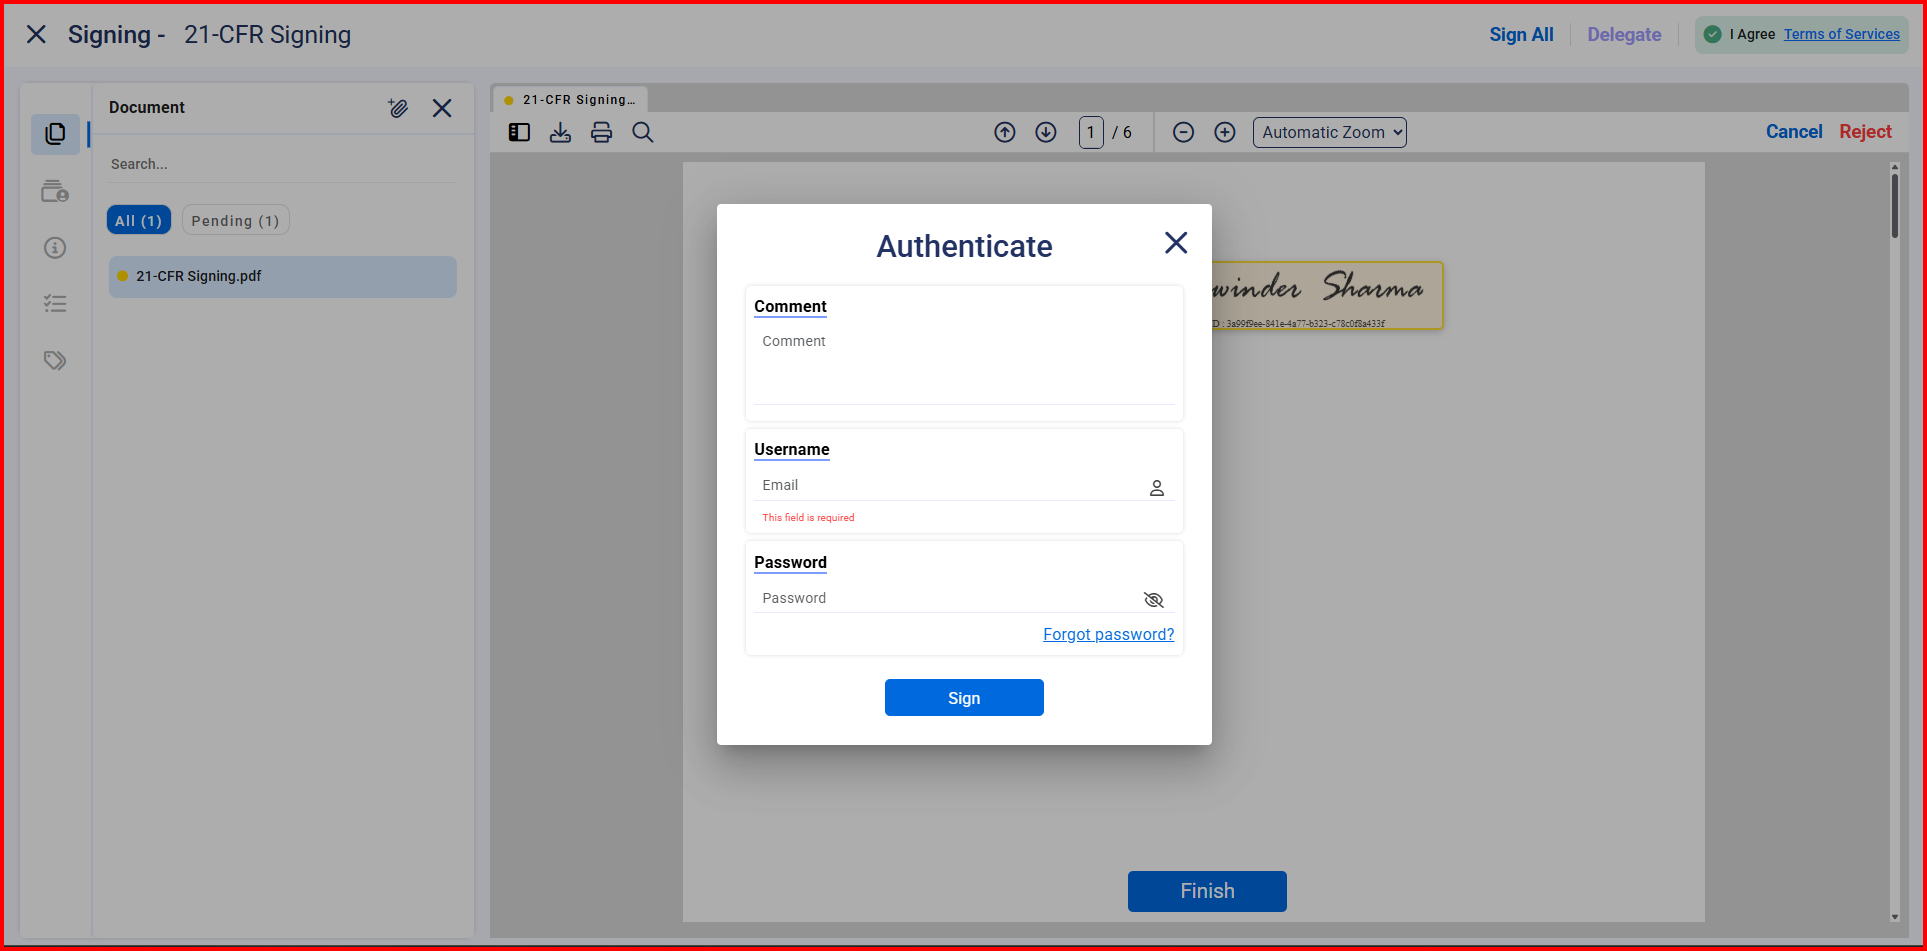
- If the ePak is using a Signatures 21 CFR policy, enter your username and password, any optional comments, and check the box indicating that you agree to the terms and conditions.
- If the ePak is using Contracts Only Policy, you would just need to confirm your signing action. However, if your instance has been configured to ask for a passcode- you would need to enter your signing passcode (password), agree to the terms & conditions of signing and then apply signatures.
You must repeat this process for every document within the ePak in order to complete the signing of the ePak. Once the ePak is complete, it will move from your Inbox folder into your Signed folder.
How do I sign an ePak?
Signing an ePak involves selecting the ePak to sign, reviewing it, adding any desired comments, and then applying your electronic and digital signatures to it. You may access your ePaks either through the ePaks link on the top navigation panel or by clicking “Signature Required” on your Dashboard.
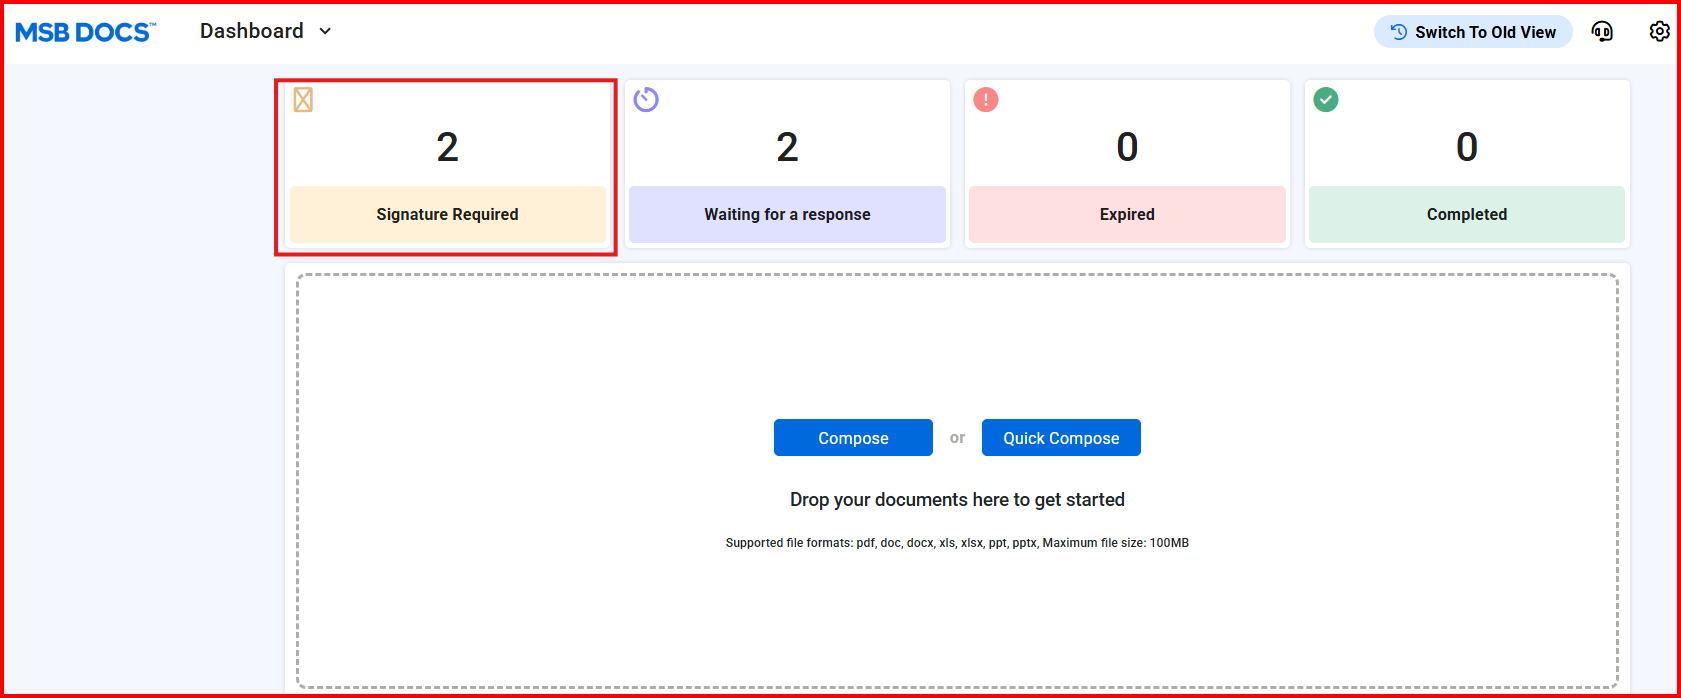
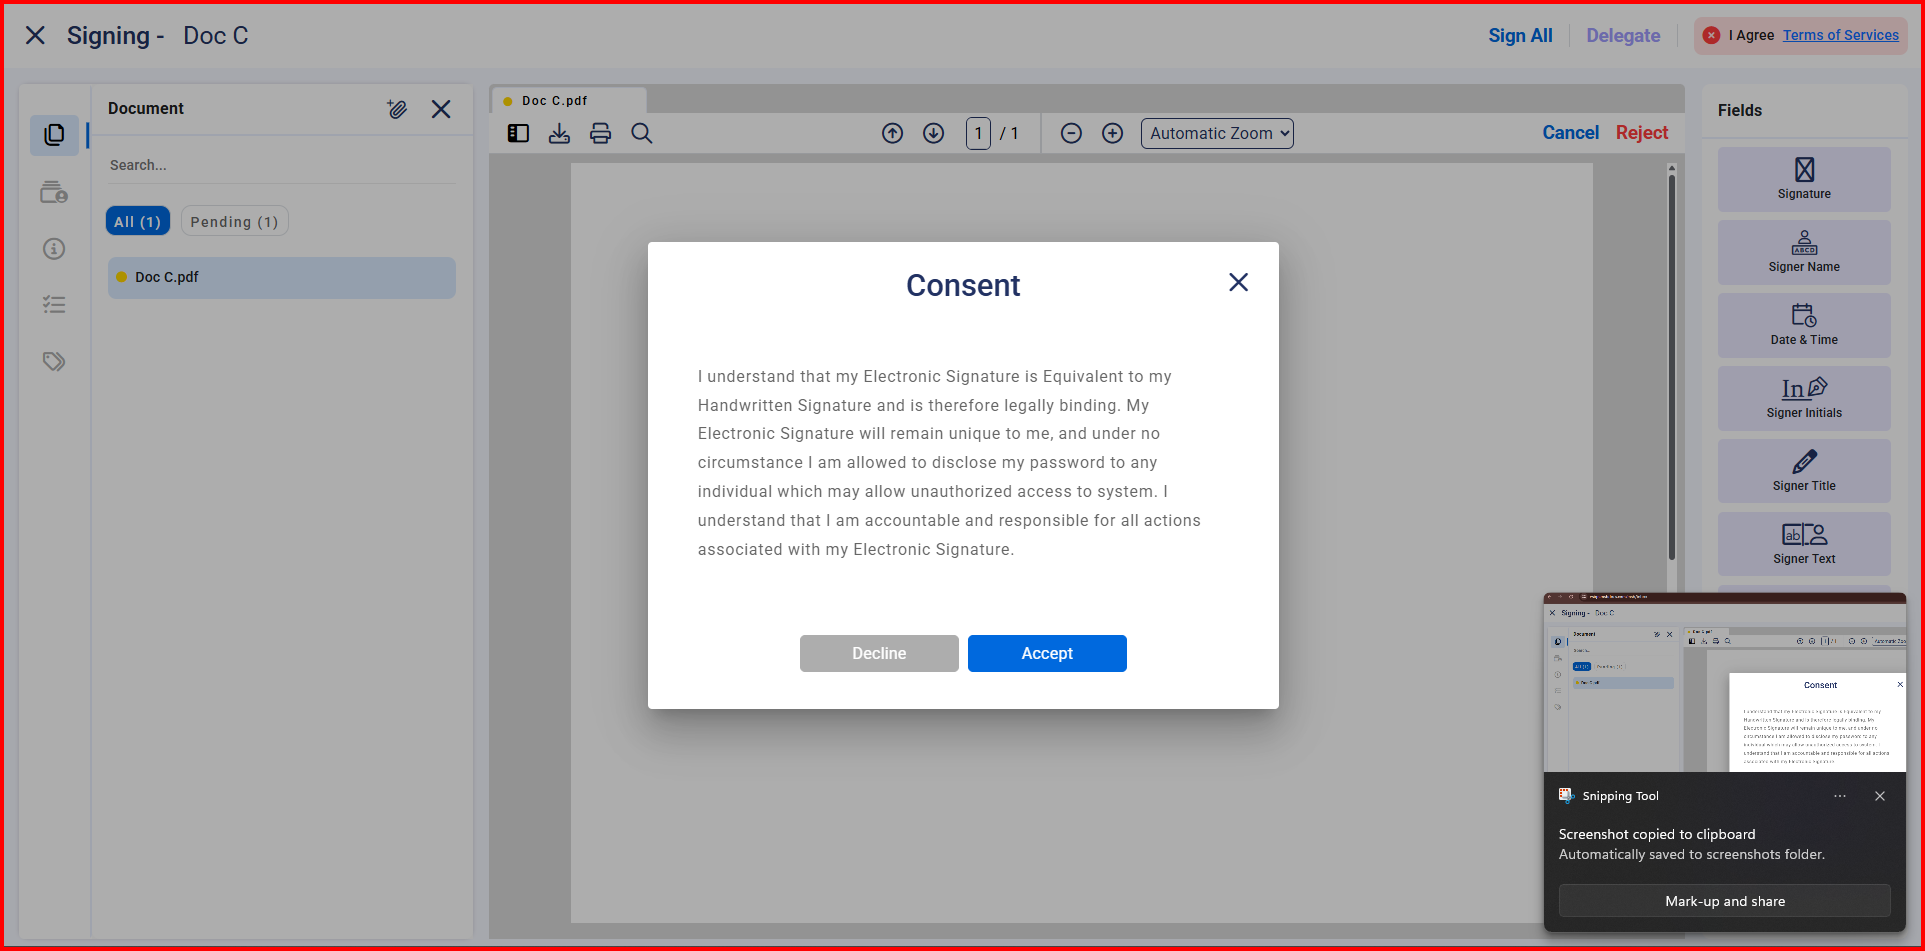
Review the ePak document(s) in the ePak preview panel. Click on Sign and Accept the Consent. Signature tags will appear. Click on the current tag to complete it. Then click the Next button at the bottom of the screen to move to the next tag. Pressing the Previous button will move the screen. Once all tags have been completed, click the Finish button at the bottom of the screen.
If the ePak is using a Signatures 21 CFR policy, enter your username (email address) and password, any optional comments, and check the box indicating that you agree to the terms and conditions. You must repeat this process for every document within the ePak to complete the signing of the ePak. Once the ePak is complete, it will move from your Inbox folder into your Signed folder.
MSB users can access a ‘Forgot Password’ link on the 21CFR authentication modal if EasySign is enabled for 21CFR policy. When user clicks the forgot password link, user will get redirected to the same place as the forgot password link on the main login form.